Description
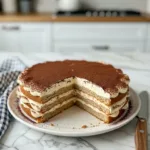
Creamy Tiramisu Layer Cake, a classic dessert, brings coffee-soaked joy and mascarpone dreams. Learn my secrets and kitchen mishaps for this comforting treat.
Ingredients
Scale
- Base & Sponge:
- 24–30 Ladyfingers (approx. 200g)
- 4 Large Eggs, separated
- 3/4 cup (150g) Granulated Sugar, divided
- The Creamy Dream:
- 16 oz (450g) Mascarpone Cheese, full-fat, softened slightly
- 1 cup (240ml) Heavy Cream, cold
- Flavor Boosters & Finishing Touches:
- 1 1/2 cups (360ml) Strong Espresso or Coffee, cooled
- 1/4 cup (60ml) Coffee Liqueur (e.g., Kahlúa) or Dark Rum/Brandy (optional)
- 1 tsp Vanilla Extract
- 2 tbsp Unsweetened Cocoa Powder, for dusting
Instructions
- Brew the Coffee & Prep the Dip: First things first, get that espresso or strong coffee brewing. Let it cool completely, or else you’ll have soggy, sad ladyfingers when building your Tiramisu Layer Cake. Once it’s cool, pour it into a shallow dish, and if you’re using liqueur, stir it in now. I always smell it at this stage, that rich coffee aroma, it just sets the stage for everything delicious to come. Honestly, don’t rush this cooling part. I once dipped warm, and it was a disaster.
- Start the Mascarpone Cream Base: Separate your eggs carefully. In a large bowl, whisk the egg yolks with about half of the granulated sugar until the mixture is pale yellow and thick. It should fall in ribbons when you lift the whisk. This is where you’re building the foundation for that luscious Tiramisu Layer Cake cream. Don’t worry if it looks a bit chunky at first; just keep whisking. I usually do this over a double boiler for a few minutes to gently cook the yolks, just to be safe, but you can skip it if you’re comfortable with raw eggs.
- Whip the Mascarpone & Fold: Add the mascarpone cheese and vanilla extract to your egg yolk mixture. Gently fold them together until just combined and smooth. Be careful not to overmix here, or your mascarpone can get grainy—oops, done that before! In a separate, clean bowl, whip the heavy cream until stiff peaks form. Then, in another bowl (yes, more bowls, sorry!), whip the egg whites with the remaining sugar until stiff and glossy peaks form. This extra step makes the Tiramisu Layer Cake so light and airy, it’s worth the extra wash-up, promise.
- Combine for the Dreamy Cream: Carefully fold the whipped mascarpone mixture into the egg yolk mixture. Then, gently fold in the whipped cream, followed by the whipped egg whites. This is the crucial stage for that light, airy texture of your Tiramisu Layer Cake. You want to keep as much air as possible, so be gentle, like you’re folding clouds. I always take a moment to admire the silky, pale cream; it just smells so good, like pure dessert heaven. Don’t be too rough, or you’ll deflate everything!
- Assemble Your Tiramisu Layer Cake: Now for the fun part! Quickly dip each ladyfinger into the cooled coffee mixture – just a quick dip, maybe a second or two per side. You don’t want them saturated, just moistened. Arrange a single layer of these coffee-soaked ladyfingers in the bottom of your serving dish. Spread about a third of the mascarpone cream evenly over the ladyfingers. Repeat with another layer of dipped ladyfingers and another third of the cream. Then, a final layer of ladyfingers, topped with the remaining cream. This Tiramisu Layer Cake is really coming together!
- Chill and Dust for Glory: Once assembled, cover your Tiramisu Layer Cake loosely with plastic wrap and chill it in the refrigerator for at least 4-6 hours, or even better, overnight. This chilling time is non-negotiable, it allows the flavors to meld and the cake to set properly. Honestly, the longer it chills, the better it tastes. Before serving, generously dust the top with unsweetened cocoa powder. I love seeing that dark cocoa contrast with the pale cream; it just screams “eat me!”