
Oh, Tiramisu Layer Cake. It takes me right back to my grandma’s kitchen, honestly. Not that she made a layer cake version, but the smells? That rich coffee, a hint of liqueur, and sweet cream. That’s her all over. I first tried making a Tiramisu Layer Cake when I was maybe twenty, trying to impress someone (spoiler: it was a mess). But the idea of those distinct layers, each soaking up flavor, just stuck with me. This isn’t your average quick dessert, no, but it’s so worth the effort, a true labor of love that feels like a big, sweet hug.
My first attempt at a Tiramisu Layer Cake was… memorable. I used instant coffee that tasted like regret, and my mascarpone cream split. It was like a sad, soggy coffee sponge. I remember staring at it, wondering what went wrong. I scooped it into a bowl and just ate it with a spoon, still tasted good, but looked like a disaster! That’s when I learned the importance of good ingredients and gentle folding.
Ingredients for Tiramisu Layer Cake
Base & Sponge
- Ladyfingers: These are the backbone of your Tiramisu Layer Cake, hon. They’re meant to soak up all that lovely coffee. Don’t go for anything too crunchy, you want them soft but not mushy.
- Large Eggs: We’re separating these, so make sure they’re fresh. The yolks give that rich, custardy texture to the mascarpone cream, and the whites, whipped stiff, add airiness.
- Granulated Sugar: Sweetens the mascarpone cream and helps stabilize those egg whites. Don’t skimp, but don’t overdo it either.
The Creamy Dream
- Mascarpone Cheese: This is the star of your Tiramisu Layer Cake! Get the good stuff, full-fat. It’s what gives the cake its signature rich, velvety texture. Honestly, don’t even think about cream cheese here. Just don’t.
- Heavy Cream: Whipped until stiff, it lightens the mascarpone mixture, making it incredibly fluffy. I once tried half-and-half, and it was just… watery. Learn from my mistakes!
Flavor Boosters & Finishing Touches
- Espresso or Strong Coffee: Freshly brewed is a must for your Tiramisu Layer Cake. This is where the magic happens, soaking the ladyfingers. I usually brew extra strong, maybe a dark roast, for that authentic Italian kick.
- Coffee Liqueur (e.g., Kahlúa) or Dark Rum/Brandy: Optional, but oh, it adds such depth! A splash in the coffee dip just elevates the flavor. I’ve tried with and without, with is always better for adults, in my humble opinion.
- Vanilla Extract: A little splash rounds out the sweetness and brings all those flavors together.
- Unsweetened Cocoa Powder: For dusting the Tiramisu Layer Cake. Use a good quality one, it really makes a difference in that final flourish.
Instructions for Tiramisu Layer Cake
- Step 1: Brew the Coffee & Prep the Dip
- First things first, get that espresso or strong coffee brewing. Let it cool completely, or else you’ll have soggy, sad ladyfingers when building your Tiramisu Layer Cake. Once it’s cool, pour it into a shallow dish, and if you’re using liqueur, stir it in now. I always smell it at this stage, that rich coffee aroma, it just sets the stage for everything delicious to come. Honestly, don’t rush this cooling part. I once dipped warm, and it was a disaster.
- Step 2: Start the Mascarpone Cream Base
- Separate your eggs carefully. In a large bowl, whisk the egg yolks with about half of the granulated sugar until the mixture is pale yellow and thick. It should fall in ribbons when you lift the whisk. This is where you’re building the foundation for that luscious Tiramisu Layer Cake cream. Don’t worry if it looks a bit chunky at first, just keep whisking. I usually do this over a double boiler for a few minutes to gently cook the yolks, just to be safe, but you can skip it if you’re comfortable with raw eggs.
- Step 3: Whip the Mascarpone & Fold
- Add the mascarpone cheese and vanilla extract to your egg yolk mixture. Gently fold them together until just combined and smooth. Be careful not to overmix here, or your mascarpone can get grainy oops, done that before! In a separate, clean bowl, whip the heavy cream until stiff peaks form. Then, in another bowl (yes, more bowls, sorry!), whip the egg whites with the remaining sugar until stiff and glossy peaks form. This extra step makes the Tiramisu Layer Cake so light and airy, it’s worth the extra wash-up, promise.
- Step 4: Combine for the Dreamy Cream
- Carefully fold the whipped mascarpone mixture into the egg yolk mixture. Then, gently fold in the whipped cream, followed by the whipped egg whites. This is the crucial stage for that light, airy texture of your Tiramisu Layer Cake. You want to keep as much air as possible, so be gentle, like you’re folding clouds. I always take a moment to admire the silky, pale cream, it just smells so good, like pure dessert heaven. Don’t be too rough, or you’ll deflate everything!
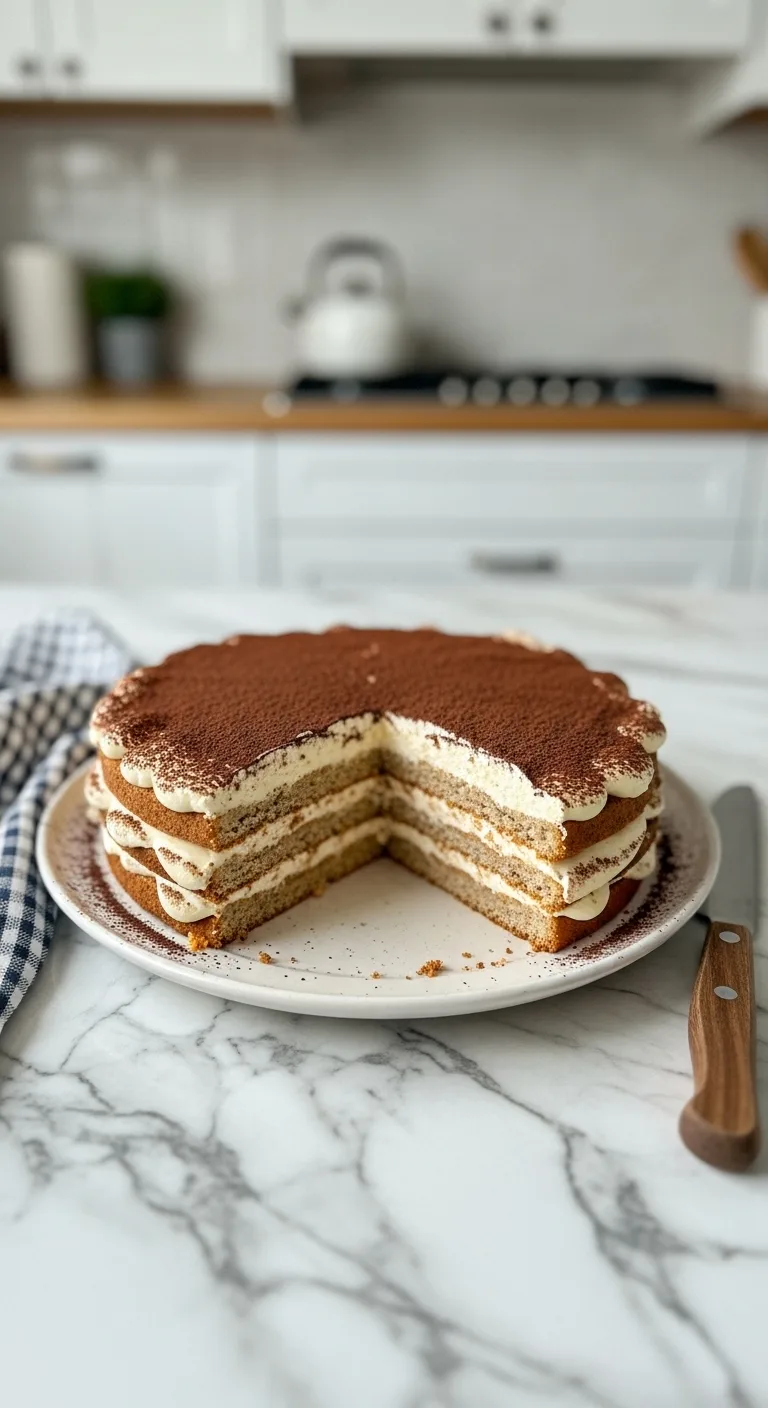
- Step 5: Assemble Your Tiramisu Layer Cake
- Now for the fun part! Quickly dip each ladyfinger into the cooled coffee mixture just a quick dip, maybe a second or two per side. You don’t want them saturated, just moistened. Arrange a single layer of these coffee-soaked ladyfingers in the bottom of your serving dish. Spread about a third of the mascarpone cream evenly over the ladyfingers. Repeat with another layer of dipped ladyfingers and another third of the cream. Then, a final layer of ladyfingers, topped with the remaining cream. This Tiramisu Layer Cake is really coming together!
- Step 6: Chill and Dust for Glory
- Once assembled, cover your Tiramisu Layer Cake loosely with plastic wrap and chill it in the refrigerator for at least 4-6 hours, or even better, overnight. This chilling time is non-negotiable, it allows the flavors to meld and the cake to set properly. Honestly, the longer it chills, the better it tastes. Before serving, generously dust the top with unsweetened cocoa powder. I love seeing that dark cocoa contrast with the pale cream, it just screams “eat me!”
I once tried to serve a Tiramisu Layer Cake that hadn’t chilled long enough. It was a wobbly, sliding mess, cream oozing everywhere. My guests were polite, but I could tell it wasn’t the elegant slice I’d envisioned. From then on, I learned my lesson: patience is key, especially with a layered dessert like this. Now, I always make it the day before, letting those flavors really deepen and the structure firm up.
Tiramisu Layer Cake Storage Tips
Got leftovers of your Tiramisu Layer Cake? Lucky you! This cake actually tastes even better the next day, once all those coffee and mascarpone flavors have really had a chance to mingle. Just cover it tightly with plastic wrap and pop it back in the fridge. It’ll keep beautifully for about 3-4 days. I wouldn’t recommend freezing it, honestly. I tried that once, and the cream texture got a bit weird and watery when thawed so don’t do that, lol. The ladyfingers also get a bit too mushy. Fresh is truly best for this one.

Tiramisu Layer Cake Ingredient Substitutions
Okay, so you’re out of ladyfingers for your Tiramisu Layer Cake? I’ve been there! You can totally use slices of sponge cake or even pound cake, thinly cut. I tried using digestive biscuits once, and it worked… kinda, but it wasn’t the same soft texture. For the coffee, if you don’t have espresso, just brew your strongest coffee. As for the liqueur, if you’re avoiding alcohol, a splash of coffee extract or even a bit more vanilla will work. I’ve also swapped out half the mascarpone for cream cheese in a pinch, but it gives a tangier flavor profile, so be warned!
Tiramisu Layer Cake Serving Suggestions
A slice of this Tiramisu Layer Cake is a treat all on its own, but sometimes I like to go all out. A dusting of extra cocoa, maybe a few chocolate shavings, really makes it look special. For drinks, a simple espresso or a robust dark roast coffee is a classic pairing. If it’s an evening thing, a glass of Vin Santo or a rich dessert wine would be lovely. And honestly, this cake and a comfy blanket on the couch with a good movie? Yes please. It’s perfect for celebrating, but also for those quiet moments when you just need a little sweet comfort.
Tiramisu Layer Cake Cultural Backstory
The Tiramisu Layer Cake, or rather, its traditional cousin, tiramisu, has such a rich history! Meaning ‘pick me up’ or ‘cheer me up’ in Italian, it’s said to have originated in the Veneto region, though some claim Tuscany or Piedmont. The combination of coffee, mascarpone, eggs, and ladyfingers is just iconic. For me, it evokes memories of bustling Italian cafes and family gatherings. My first taste of proper tiramisu was on a trip to Italy, and it was so much more than just a dessert, it was an experience. Creating a Tiramisu Layer Cake version at home feels like bringing a piece of that history and comfort into my own kitchen.
Making this Tiramisu Layer Cake always feels like a little triumph in my kitchen. From brewing the coffee to gently folding the cream, each step is a moment to savor. And that first slice? Pure bliss, honestly. The way the coffee soaks into the ladyfingers, the lightness of the mascarpone cream, and that hint of cocoa it’s just magic. I hope you give this one a try and make it your own. Let me know how your Tiramisu Layer Cake turns out!

Frequently Asked Questions
- → Can I make this Tiramisu Layer Cake ahead of time?
Yes, you absolutely can! In fact, I highly recommend making your Tiramisu Layer Cake the day before you plan to serve it. It gives all those wonderful flavors a chance to really meld together, and the cake sets beautifully. I’ve found it tastes even better after a full 24 hours in the fridge.
- → What if I don’t have a stand mixer for the Tiramisu Layer Cake?
No worries at all! You can totally make this Tiramisu Layer Cake with a hand mixer. It might take a little longer to whip the cream and egg whites, and your arm might get a workout, but it’s completely doable. Just be patient and keep an eye on those peaks!
- → My mascarpone cream for the Tiramisu Layer Cake looks a bit lumpy. What happened?
Oh, I’ve been there! Usually, lumpy mascarpone happens if you overmix it, or if it’s too cold straight from the fridge. Try to let it sit at room temperature for about 15-20 minutes before using, and fold it very gently. It should smooth out as you combine it with the other ingredients.
- → How do I get clean slices of Tiramisu Layer Cake?
For super clean slices, make sure your Tiramisu Layer Cake is thoroughly chilled, preferably overnight. When you’re ready to serve, run a sharp knife under hot water, wipe it dry, and then make your cut. Clean the knife between each slice. It’s a little extra effort, but it makes such a difference!
- → Can I add other flavors to my Tiramisu Layer Cake?
Absolutely! While classic Tiramisu Layer Cake is perfect, you can totally experiment. I’ve seen people add a touch of orange zest, or even a different liqueur like amaretto. Just be mindful not to overpower the coffee and mascarpone. Have fun with it!

Creamy Tiramisu Layer Cake: A Home Baker’s Tale
- Prep Time: 45 Minutes
- Cook Time: 5 Minutes
- Total Time: 5 Hours
- Yield: 8-10 Servings 1x
- Category: Tasty Recipes
Description
Creamy Tiramisu Layer Cake, a classic dessert, brings coffee-soaked joy and mascarpone dreams. Learn my secrets and kitchen mishaps for this comforting treat.
Ingredients
- Base & Sponge:
- 24–30 Ladyfingers (approx. 200g)
- 4 Large Eggs, separated
- 3/4 cup (150g) Granulated Sugar, divided
- The Creamy Dream:
- 16 oz (450g) Mascarpone Cheese, full-fat, softened slightly
- 1 cup (240ml) Heavy Cream, cold
- Flavor Boosters & Finishing Touches:
- 1 1/2 cups (360ml) Strong Espresso or Coffee, cooled
- 1/4 cup (60ml) Coffee Liqueur (e.g., Kahlúa) or Dark Rum/Brandy (optional)
- 1 tsp Vanilla Extract
- 2 tbsp Unsweetened Cocoa Powder, for dusting
Instructions
- Brew the Coffee & Prep the Dip: First things first, get that espresso or strong coffee brewing. Let it cool completely, or else you’ll have soggy, sad ladyfingers when building your Tiramisu Layer Cake. Once it’s cool, pour it into a shallow dish, and if you’re using liqueur, stir it in now. I always smell it at this stage, that rich coffee aroma, it just sets the stage for everything delicious to come. Honestly, don’t rush this cooling part. I once dipped warm, and it was a disaster.
- Start the Mascarpone Cream Base: Separate your eggs carefully. In a large bowl, whisk the egg yolks with about half of the granulated sugar until the mixture is pale yellow and thick. It should fall in ribbons when you lift the whisk. This is where you’re building the foundation for that luscious Tiramisu Layer Cake cream. Don’t worry if it looks a bit chunky at first; just keep whisking. I usually do this over a double boiler for a few minutes to gently cook the yolks, just to be safe, but you can skip it if you’re comfortable with raw eggs.
- Whip the Mascarpone & Fold: Add the mascarpone cheese and vanilla extract to your egg yolk mixture. Gently fold them together until just combined and smooth. Be careful not to overmix here, or your mascarpone can get grainy—oops, done that before! In a separate, clean bowl, whip the heavy cream until stiff peaks form. Then, in another bowl (yes, more bowls, sorry!), whip the egg whites with the remaining sugar until stiff and glossy peaks form. This extra step makes the Tiramisu Layer Cake so light and airy, it’s worth the extra wash-up, promise.
- Combine for the Dreamy Cream: Carefully fold the whipped mascarpone mixture into the egg yolk mixture. Then, gently fold in the whipped cream, followed by the whipped egg whites. This is the crucial stage for that light, airy texture of your Tiramisu Layer Cake. You want to keep as much air as possible, so be gentle, like you’re folding clouds. I always take a moment to admire the silky, pale cream; it just smells so good, like pure dessert heaven. Don’t be too rough, or you’ll deflate everything!
- Assemble Your Tiramisu Layer Cake: Now for the fun part! Quickly dip each ladyfinger into the cooled coffee mixture – just a quick dip, maybe a second or two per side. You don’t want them saturated, just moistened. Arrange a single layer of these coffee-soaked ladyfingers in the bottom of your serving dish. Spread about a third of the mascarpone cream evenly over the ladyfingers. Repeat with another layer of dipped ladyfingers and another third of the cream. Then, a final layer of ladyfingers, topped with the remaining cream. This Tiramisu Layer Cake is really coming together!
- Chill and Dust for Glory: Once assembled, cover your Tiramisu Layer Cake loosely with plastic wrap and chill it in the refrigerator for at least 4-6 hours, or even better, overnight. This chilling time is non-negotiable, it allows the flavors to meld and the cake to set properly. Honestly, the longer it chills, the better it tastes. Before serving, generously dust the top with unsweetened cocoa powder. I love seeing that dark cocoa contrast with the pale cream; it just screams “eat me!”


