
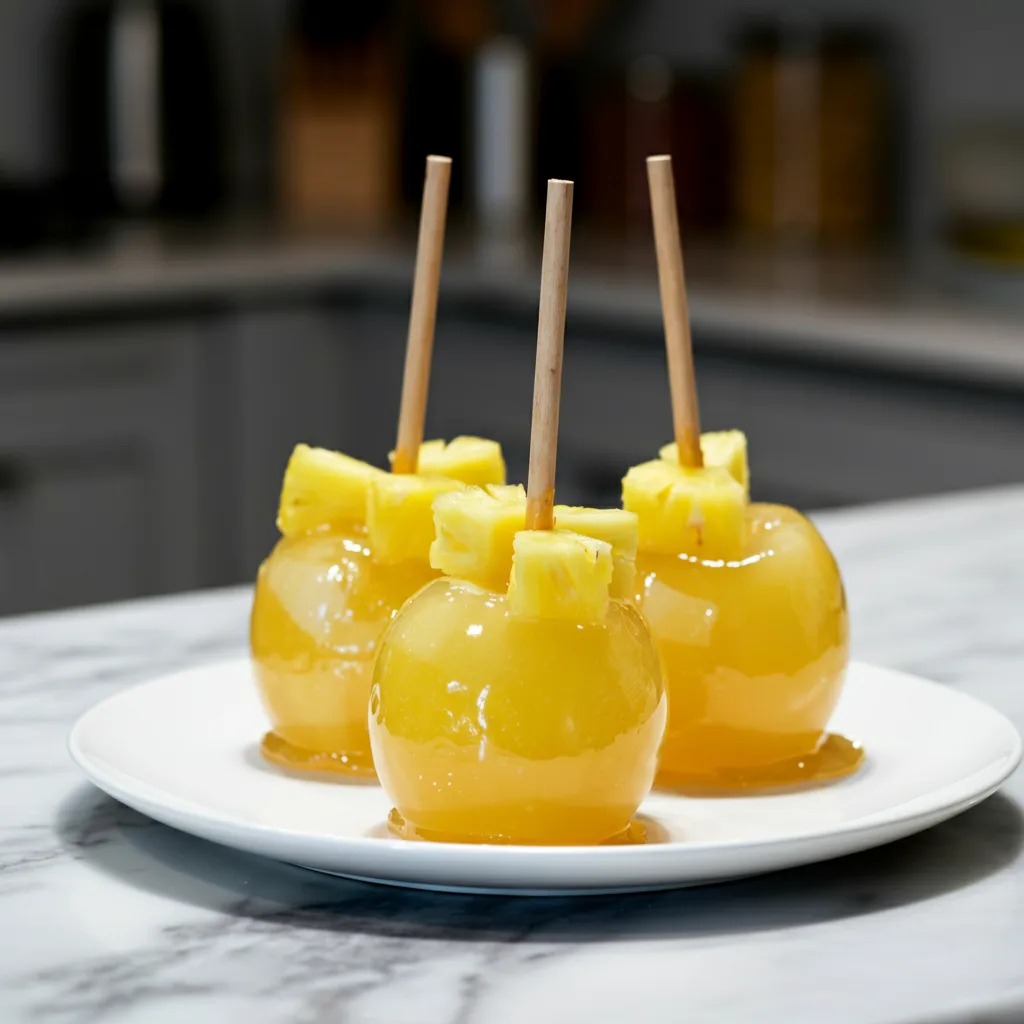
I remember the first time I tried combining pineapple and lemonade flavors it was a total happy accident during a summer fair trip. I was trying to recreate those classic candy apples but wanted something brighter, something that screamed sunshine. My kitchen, honestly, looked like a sticky disaster zone that day. But out of that glorious mess, these Pineapple Lemonade Candy Apples were born. They’re not just a treat, they’re a little burst of pure joy, a tangy, sweet crunch that brings me right back to those carefree summer days. They’re special because they remind me that sometimes the best things come from a bit of kitchen chaos.
Oh, the first batch! I totally underestimated how quickly the candy coating sets. I had this grand vision of perfectly swirled colors, but it ended up looking like a modern art piece… if modern art involved a lot of lumpy, uneven candy. My husband, bless his heart, still ate them with a smile. Lesson learned: move fast, and don’t be afraid if they’re not picture-perfect. Rustic charm, right?
Ingredients
- Granny Smith Apples: Honestly, these are non-negotiable for candy apples. Their tartness cuts through all that sweet candy coating in the most wonderful way. I’ve tried other apples, and they just get lost. Don’t even think about a Red Delicious here, trust me.
- Granulated Sugar: The backbone of our candy. I mean, it’s a candy apple, right? Use good quality sugar, it makes a difference in the clarity and shine.
- Light Corn Syrup: This little secret weapon keeps our candy from crystallizing and makes it super smooth. I once tried to skip it, thinking “nah, it’ll be fine,” and ended up with grainy, sad apples. Never again!
- Lemonade Concentrate: This is where the magic happens! It gives us that signature tangy lemonade flavor without adding too much liquid. Make sure it’s thawed but still cold.
- Pineapple Extract: A few drops of this bring a tropical punch that elevates the whole experience. I didn’t expect it to make such a difference, but it truly does!
- Yellow Food Coloring (Gel): Just a few drops to give our Pineapple Lemonade Candy Apples that vibrant, sunny hue. Gel colors are my fave, they give a richer color without thinning out the mixture.
- Wooden Skewers: You need something sturdy to hold onto! I’ve had plastic sticks snap before, leading to a sticky apple on the floor. Rookie mistake!
- Non-stick Cooking Spray: A quick spritz on your parchment paper makes cooling a breeze and prevents sticking. Believe me, you don’t want to fight a candy apple.
Instructions
- Prep Your Pineapple Lemonade Candy Apples:
- First things first, wash those apples really well. I scrub them to get any waxy coating off, it helps the candy stick. Then, twist off the stems. Carefully insert a wooden skewer into the stem end of each apple, pushing it about halfway through. I usually line a baking sheet with parchment paper and lightly spray it with non-stick spray at this point, just to be ready.
- Begin the Zesty Coating:
- In a medium, heavy-bottomed saucepan, combine the granulated sugar, light corn syrup, and thawed lemonade concentrate. Stir gently over medium heat until the sugar dissolves. Resist the urge to stir constantly, I’ve learned that too much stirring can encourage crystallization, and we want that smooth, glassy finish for our Pineapple Lemonade Candy Apples.
- Boil to Perfection:
- Once the sugar is dissolved, stop stirring. Bring the mixture to a rolling boil. Insert a candy thermometer, making sure it doesn’t touch the bottom of the pan. Let it boil, watching that thermometer like a hawk, until it reaches 300°F (149°C), also known as the hard crack stage. This is crucial, if it’s too cool, your candy will be soft, and too hot, it’ll burn.
- Infuse the Flavors:
- The moment it hits 300°F, immediately remove the pan from the heat. This is where I always add my pineapple extract and a few drops of yellow food coloring. Stir it in quickly and gently just enough to combine. You’ll smell that amazing pineapple lemonade aroma instantly! Work fast here, as the candy starts to set pretty quickly.
- Dip Your Pineapple Lemonade Candy Apples:
- Carefully, holding an apple by its skewer, dip it into the hot candy mixture. Swirl it around to coat completely, then lift it out, letting any excess drip back into the pan. I usually twirl it a bit to ensure an even coat and to prevent puddles at the bottom. This part is a bit of a race against time, honestly!
- Cool and Enjoy:
- Place each coated apple onto your prepared parchment-lined baking sheet. Let them cool completely at room temperature. This takes about 20-30 minutes, and honestly, the wait is the hardest part! Once they’re firm and shiny, these Pineapple Lemonade Candy Apples are ready to be devoured. They’ll be perfectly crisp and wonderfully tangy.
There’s something so satisfying about seeing those glossy, vibrant Pineapple Lemonade Candy Apples cooling on the counter. It’s a little messy, sure, with drips and sticky fingers, but it’s a happy mess. One time, my dog, bless her heart, tried to sneak a lick while they were cooling. Luckily, I caught her! It just adds to the chaotic charm of making these treats, you know?
Storage Tips for Pineapple Lemonade Candy Apples
These Pineapple Lemonade Candy Apples are best eaten within a day or two, honestly. The candy coating can start to get a little sticky from humidity if they sit too long, which I’ve found out after leaving a batch out during a humid summer day they weren’t quite as crisp. Store them individually wrapped in plastic wrap at room temperature. Don’t put them in the fridge, that can make the candy sweat and get gooey, and nobody wants a soggy candy apple. They usually last me about 2-3 days before the texture starts to change, so plan to enjoy them fresh!

Ingredient Substitutions
I’ve played around with a few things. If you can’t find lemonade concentrate, you can try using fresh lemon juice mixed with a bit more sugar and water, but you’ll need to adjust the liquid content carefully to hit that hard crack stage I tried it once and it worked… kinda, but it was a bit more finicky. For the pineapple extract, you could try a tiny bit of pineapple juice, but again, watch the liquid! Honestly, for the best Pineapple Lemonade Candy Apples, sticking to the recipe is usually the way to go for that vibrant flavor and perfect texture.
Serving Suggestions
These Pineapple Lemonade Candy Apples are fantastic on their own, a real showstopper! I love serving them at backyard BBQs or even just as a fun dessert after a simple weeknight dinner. They pair really well with a glass of iced tea, or for an adult twist, a crisp, dry sparkling wine the bubbles really play off the tangy sweetness. For a super fun party, I sometimes chop them into wedges right before serving and arrange them on a platter, it makes them easier to eat and share, and they still look gorgeous.
Cultural Backstory
Candy apples always remind me of carnivals and fairs from my childhood. There’s something so nostalgic about them, a treat that transcends generations. My version, these Pineapple Lemonade Candy Apples, is my little homage to those classic memories, but with a bright, modern twist. I wanted to capture that joyful, slightly sticky, vibrant feeling of summer, and bringing in the zesty lemonade and tropical pineapple just felt like the right way to make them truly my own. It’s a taste of pure, unadulterated fun, just like those childhood fair trips.
These Pineapple Lemonade Candy Apples truly are a labor of love, but oh, so worth it! That tangy, sweet crunch is just everything. I love how they bring a little bit of sunshine into any room, no matter the weather outside. Don’t be afraid to get a little messy in the kitchen, that’s where the best memories are made. I hope you give these a try and share your own kitchen adventures with me!

Frequently Asked Questions About Pineapple Lemonade Candy Apples
- → Why did my Pineapple Lemonade Candy Apples turn out sticky?
This usually happens if your candy didn’t reach the full 300°F hard crack stage. Or, sometimes, high humidity can make them sticky after they’ve cooled. I’ve had that happen during a summer thunderstorm!
- → Can I use other types of apples for Pineapple Lemonade Candy Apples?
You can, but I really recommend Granny Smith for that essential tart contrast. Other apples might be too sweet or get mushy, and the flavor just won’t pop the same way, honestly.
- → How do I prevent bubbles in the candy coating?
Bubbles often come from stirring too much or dipping too quickly. Try to dip the apple slowly and evenly, and let any bubbles rise before coating. I also sometimes tilt the pot a little to get rid of them.
- → How long do Pineapple Lemonade Candy Apples last?
They’re best within 2-3 days when stored at room temperature, individually wrapped. After that, the candy might start to soften or get a bit grainy, losing its perfect crunch, from my experience.
- → Can I add other flavors to the candy coating?
Absolutely! I’ve experimented with a touch of lime extract for a “tropical punch” vibe. Just be mindful not to add too much liquid, and always add extracts after removing from heat.

Pineapple Lemonade Candy Apples: Tangy Sweet Crunch
- Prep Time: 20 Minutes
- Cook Time: 25 Minutes
- Total Time: 45 Minutes
- Yield: 8 Servings 1x
- Category: Tasty Recipes
Description
Pineapple Lemonade Candy Apples bring a zesty, sweet crunch to your day. Learn my easy recipe for this vibrant treat, perfect for any fun gathering!
Ingredients
- Crisp Apple Base:
- 8 medium Granny Smith apples
- Zesty Candy Coating:
- 3 cups granulated sugar
- 1 cup light corn syrup
- 1 cup thawed lemonade concentrate
- 1 teaspoon pineapple extract
- 5–7 drops yellow gel food coloring
- Finishing Touches:
- 8 wooden skewers
- Non-stick cooking spray for parchment paper
Instructions
- Prep Your Pineapple Lemonade Candy Apples: First things first, wash those apples really well. I scrub them to get any waxy coating off; it helps the candy stick. Then, twist off the stems. Carefully insert a wooden skewer into the stem end of each apple, pushing it about halfway through. I usually line a baking sheet with parchment paper and lightly spray it with non-stick spray at this point, just to be ready.
- Begin the Zesty Coating: In a medium, heavy-bottomed saucepan, combine the granulated sugar, light corn syrup, and thawed lemonade concentrate. Stir gently over medium heat until the sugar dissolves. Resist the urge to stir constantly; I’ve learned that too much stirring can encourage crystallization, and we want that smooth, glassy finish for our Pineapple Lemonade Candy Apples.
- Boil to Perfection: Once the sugar is dissolved, stop stirring. Bring the mixture to a rolling boil. Insert a candy thermometer, making sure it doesn’t touch the bottom of the pan. Let it boil, watching that thermometer like a hawk, until it reaches 300°F (149°C), also known as the hard crack stage. This is crucial; if it’s too cool, your candy will be soft, and too hot, it’ll burn.
- Infuse the Flavors: The moment it hits 300°F, immediately remove the pan from the heat. This is where I always add my pineapple extract and a few drops of yellow food coloring. Stir it in quickly and gently – just enough to combine. You’ll smell that amazing pineapple lemonade aroma instantly! Work fast here, as the candy starts to set pretty quickly.
- Dip Your Pineapple Lemonade Candy Apples: Carefully, holding an apple by its skewer, dip it into the hot candy mixture. Swirl it around to coat completely, then lift it out, letting any excess drip back into the pan. I usually twirl it a bit to ensure an even coat and to prevent puddles at the bottom. This part is a bit of a race against time, honestly!
- Cool and Enjoy: Place each coated apple onto your prepared parchment-lined baking sheet. Let them cool completely at room temperature. This takes about 20-30 minutes, and honestly, the wait is the hardest part! Once they’re firm and shiny, these Pineapple Lemonade Candy Apples are ready to be devoured. They’ll be perfectly crisp and wonderfully tangy.


