
Honestly, some of my favorite kitchen moments aren’t about fancy dinners, but about recreating those simple, comforting tastes from childhood. Remember that classic peanut butter and jelly sandwich? The one that just felt like home? Well, one sunny afternoon, rummaging through the fridge, I found myself with a tub of plain Greek yogurt and a serious PB&J craving. I didn’t want a sandwich, though. I wanted something cool, something quick, something that felt a little bit like a secret dessert. That’s how these PB&J Swirl Yogurt Bites came to life a happy accident born from a nostalgic heart and a slightly messy kitchen.
The first time I made these PB&J Swirl Yogurt Bites, I was so excited about the swirling part that I ended up with a dollop of jelly on my nose. My little one just pointed and giggled, and honestly, that’s pretty standard around here. It wasn’t the most elegant kitchen moment, but the result? Pure magic. They’re sweet, tangy, and that creamy texture just melts in your mouth. They’re a little bit imperfect, just like my kitchen, and that’s exactly why I love them.
Ingredients for PB&J Swirl Yogurt Bites
- Full-Fat Greek Yogurt: Honestly, don’t skimp on the full-fat stuff. I tried low-fat once, thinking I was being ‘healthy,’ and it was just… sad. The texture wasn’t right, and it lost that creamy richness.
- Creamy Peanut Butter: Creamy, not crunchy, for that smooth swirl. My kids swear by Jif, but any natural creamy peanut butter works wonderfully here. You want it to be easily dollop-able.
- Grape or Strawberry Jelly: Homemade is a dream, but a good quality store-bought works just fine. I once grabbed sugar-free by mistake never again! It just didn’t have that classic zing.
- Maple Syrup or Honey: Just a touch, to balance the tartness of the yogurt. Maple syrup gives it a deeper, warmer sweetness, which I usually lean towards.
- Vanilla Extract: A little secret weapon for warmth. It really enhances the other flavors and makes the yogurt base sing.
- Pinch of Salt: Seriously, it makes the flavors pop. I always forget this in sweet stuff, but it’s a game-changer for balancing the sweetness!
Crafting Your PB&J Swirl Yogurt Bites
- Prep Your Base:
- Grab a medium bowl and spoon in that glorious Greek yogurt. Add the maple syrup (or honey), vanilla extract, and that crucial pinch of salt. Stir it all together until it’s beautifully smooth and well combined. This is where I get a bit carried away, stirring like I’m whipping up a grand dessert, even though it’s just yogurt! Make sure there are no lumps, hon, we want a silky base for our PB&J Swirl Yogurt Bites.
- Line Your Pan:
- Line a small baking sheet or a shallow dish (about 8×8 inches works well for me) with parchment paper. Leave a little overhang on the sides it makes lifting the frozen slab out so much easier, trust me. I once forgot the overhang and had to practically chisel it out, oops! Carefully spread your yogurt mixture evenly over the parchment paper. Don’t worry about it being absolutely perfect.
- Prepare the Swirls:
- In a separate small bowl, briefly warm the peanut butter in the microwave for about 15-20 seconds until it’s a bit more fluid but not hot. This makes it easier to drizzle. Do the same with the jelly just a quick 10-15 seconds. I always make a mess here, trying to get that perfect dollop without dripping everywhere, but it’s part of the fun, right?
- Create the Swirls:
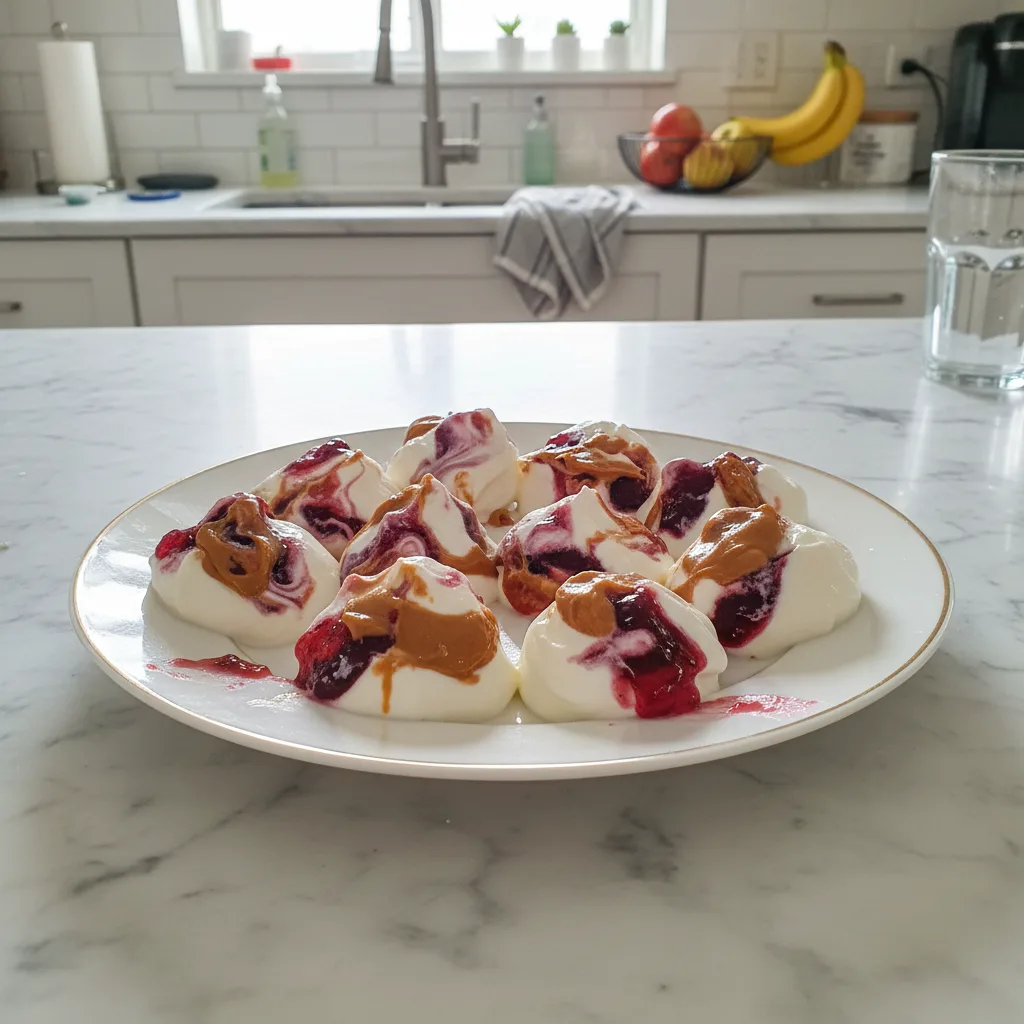
- Now for the artistic part! Dollop spoonfuls of the warmed peanut butter and jelly randomly over the yogurt base. Don’t be shy, but also don’t completely cover it. Then, grab a skewer or a butter knife and gently swirl the peanut butter and jelly into the yogurt. This is the fun part, but don’t overmix! You want distinct swirls of color, not just a brown-pink blob. You’ll see those beautiful ribbons forming, and it’s so satisfying.
- Freeze ‘Em Up:
- Carefully transfer your baking sheet with the swirled yogurt to the freezer. Let it chill there for at least 2-3 hours, or until it’s completely firm and solid. Waiting is always the hardest part, isn’t it? I usually sneak a spoonful of the remaining yogurt mixture before it goes in, oops! Make sure your freezer is nice and cold for the best results for your PB&J Swirl Yogurt Bites.
- Break and Serve:
- Once fully frozen, lift the parchment paper out of the pan and place the frozen yogurt slab on a cutting board. You can either cut it into squares or, my favorite, simply break it into irregular, rustic pieces. Sometimes they break unevenly, but that’s the charm of homemade, I tell myself. Seeing those swirls always makes me smile. My little ones grab them straight from the freezer, and honestly, it’s the best feeling!
Making these PB&J Swirl Yogurt Bites always brings a smile to my face. There’s a joy in creating something so simple, yet so satisfying. I remember one time, trying to make them extra fancy for a playdate, and I ended up with a giant blob of un-swirled chaos. My friend just laughed and said, “Looks like art to me!” And honestly, that’s what home cooking is about embracing the mess, sharing the love, and enjoying the process, even if it’s not picture-perfect.
PB&J Swirl Yogurt Bites Storage Tips
These PB&J Swirl Yogurt Bites are freezer superstars, which is why I love making a big batch. Once they’re completely frozen and broken into pieces, transfer them to an airtight freezer-safe container. The key to avoiding freezer burn and keeping them tasting fresh is to press a piece of plastic wrap directly onto the surface of the bites before you seal the lid. I learned this the hard way after pulling out a batch that tasted a bit “freezer-y” once don’t make my mistake, lol. They’ll keep beautifully in the freezer for up to 2-3 weeks. Just grab them straight from the freezer when a craving hits! No need to thaw, they’re meant to be enjoyed cold.

PB&J Swirl Yogurt Bites: Ingredient Substitutions
Life in the kitchen is all about experimenting, right? For these PB&J Swirl Yogurt Bites, I’ve tried a few swaps that worked… kinda. If you’re not a peanut butter fan, almond butter or cashew butter works wonderfully, giving a slightly different but equally creamy flavor. For the jelly, feel free to use your favorite jam raspberry, apricot, or even a mixed berry preserve can offer a delightful twist. I once used a homemade fig jam, and it was a surprisingly sophisticated version! If you don’t have maple syrup, honey is a perfect 1:1 swap. Want to make it vegan? Just ensure your yogurt is plant-based (coconut or almond yogurt work great!) and your peanut butter and jelly are vegan-friendly. Play around, see what you like!
Serving Your PB&J Swirl Yogurt Bites
These PB&J Swirl Yogurt Bites are so versatile! They’re fantastic simply grabbed straight from the freezer for a quick, cooling snack on a warm afternoon. I love them as a light, sweet breakfast alongside a cup of coffee when I’m rushing out the door. For an after-dinner treat, sometimes I’ll crumble a few over a bowl of fresh berries or a scoop of vanilla ice cream it adds a lovely textural and flavor contrast. They’re also surprisingly good with a sprinkle of flaky sea salt on top right before serving, it really brings out the sweet and savory notes. Honestly, they’re good any time you need a little burst of nostalgic comfort.
Cultural Backstory of PB&J Swirl Yogurt Bites
While these PB&J Swirl Yogurt Bites are a modern take, their heart belongs to the classic American peanut butter and jelly sandwich. That humble sandwich, a staple in lunchboxes and kitchens across the US, has roots going back to the early 20th century, gaining popularity during the Great Depression for its affordability and protein. For me, it evokes memories of childhood picnics and rushed school mornings. This recipe is my way of honoring that simple, comforting combination taking the familiar flavors of creamy peanut butter and sweet fruit jelly and transforming them into a healthier, no-fuss treat. It’s a little nod to tradition, with a fresh, cool twist that feels just right for today.
So there you have it, my little secret for capturing that childhood joy in a grown-up (but still fun!) way. These PB&J Swirl Yogurt Bites are more than just a recipe, they’re a little piece of comfort, a reminder that sometimes the simplest things are the most delicious. I hope you make them, make a happy mess, and find as much joy in those swirls as I do. Let me know how your batch turns out!

Frequently Asked Questions About PB&J Swirl Yogurt Bites
- → Can I use plain yogurt for these PB&J Swirl Yogurt Bites?
Absolutely! I always use plain Greek yogurt because it’s thick and tangy, which balances the sweetness. Just make sure it’s Greek for that creamy texture. I tried regular plain yogurt once, and it was too watery, honestly.
- → What if my yogurt is too thin for PB&J Swirl Yogurt Bites?
If your yogurt seems a bit thin, you can try straining it through a cheesecloth-lined sieve for an hour or two in the fridge. This will remove excess whey and thicken it up. I’ve had to do this when I accidentally bought the wrong kind!
- → How do I get clean swirls in my PB&J Swirl Yogurt Bites?
The trick is to warm your peanut butter and jelly just slightly so they’re more fluid, but don’t overmix them into the yogurt. Just a few gentle passes with a skewer are enough. I always want to keep swirling, but less is more for distinct lines!
- → How long do PB&J Swirl Yogurt Bites last in the freezer?
Stored properly in an airtight container with plastic wrap pressed directly on top, these bites will stay fresh and delicious in the freezer for about 2-3 weeks. I’ve definitely stretched it to a month, but they’re best within a few weeks!
- → Can I add other mix-ins to my PB&J Swirl Yogurt Bites?
Oh, absolutely! That’s the fun part! I’ve experimented with a sprinkle of mini chocolate chips, chopped nuts, or even a dash of cinnamon in the yogurt base. Just add them before freezing. It’s all about what you love!

PB&J Swirl Yogurt Bites: Easy No-Bake Treat
- Prep Time: 15 Minutes
- Cook Time: 0 Minutes
- Total Time: 2 Hours 15 Minutes
- Yield: 8 Servings 1x
- Category: Desserts
Description
Simple PB&J Swirl Yogurt Bites are a nostalgic, no-bake snack. Whipped yogurt, peanut butter, and fruit jelly swirled into delightful freezer bites.
Ingredients
- Creamy Base:
- 2 cups (500g) full-fat Greek yogurt
- 2 tablespoons maple syrup or honey (adjust to taste)
- 1 teaspoon vanilla extract
- Pinch of salt
- Classic Swirls:
- 1/4 cup creamy peanut butter
- 1/4 cup grape or strawberry jelly
- Optional Boosters:
- 1 tablespoon chopped roasted peanuts (for sprinkling)
- 2 tablespoons mini chocolate chips
Instructions
- Prep Your Base:: Grab a medium bowl and spoon in that glorious Greek yogurt. Add the maple syrup (or honey), vanilla extract, and that crucial pinch of salt. Stir it all together until it’s beautifully smooth and well combined. This is where I get a bit carried away, stirring like I’m whipping up a grand dessert, even though it’s just yogurt! Make sure there are no lumps, hon; we want a silky base for our PB&J Swirl Yogurt Bites.
- Line Your Pan:: Line a small baking sheet or a shallow dish (about 8×8 inches works well for me) with parchment paper. Leave a little overhang on the sides—it makes lifting the frozen slab out so much easier, trust me. I once forgot the overhang and had to practically chisel it out, oops! Carefully spread your yogurt mixture evenly over the parchment paper. Don’t worry about it being absolutely perfect.
- Prepare the Swirls:: In a separate small bowl, briefly warm the peanut butter in the microwave for about 15-20 seconds until it’s a bit more fluid but not hot. Do the same with the jelly—just a quick 10-15 seconds. This makes them easier to drizzle. I always make a mess here, trying to get that perfect dollop without dripping everywhere, but it’s part of the fun, right?
- Create the Swirls:: Now for the artistic part! Dollop spoonfuls of the warmed peanut butter and jelly randomly over the yogurt base. Don’t be shy, but also don’t completely cover it. Then, grab a skewer or a butter knife and gently swirl the peanut butter and jelly into the yogurt. This is the fun part, but don’t overmix! You want distinct swirls of color, not just a brown-pink blob. You’ll see those beautiful ribbons forming, and it’s so satisfying.
- Freeze ‘Em Up:: Carefully transfer your baking sheet with the swirled yogurt to the freezer. Let it chill there for at least 2-3 hours, or until it’s completely firm and solid. Waiting is always the hardest part, isn’t it? I usually sneak a spoonful of the remaining yogurt mixture before it goes in, oops! Make sure your freezer is nice and cold for the best results for your PB&J Swirl Yogurt Bites.
- Break and Serve:: Once fully frozen, lift the parchment paper out of the pan and place the frozen yogurt slab on a cutting board. You can either cut it into squares or, my favorite, simply break it into irregular, rustic pieces. Sometimes they break unevenly, but that’s the charm of homemade, I tell myself. Seeing those swirls always makes me smile. My little ones grab them straight from the freezer, and honestly, it’s the best feeling!


