Description
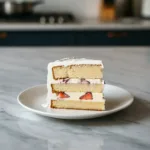
Homemade Ice Cream Cake brings back sweet memories. Layered with rich ice cream and crunchy cookie crust, it’s a simple, delightful dessert for any celebration.
Ingredients
Scale
- Crust & Base:
- 30 Oreo Cookies (about 1 package)
- 1/2 cup (113g) unsalted butter, melted
- Ice Cream Layers:
- 1.5 quarts good quality vanilla ice cream, softened
- 1.5 quarts good quality chocolate ice cream, softened
- Toppings & Finish:
- 1 cup hot fudge sauce, slightly warmed
- 8 ounces whipped topping (like Cool Whip), thawed
- Optional Swirls:
- 2 tablespoons caramel sauce, for drizzling
- 2 tablespoons chocolate sprinkles, for garnish
Instructions
- Crush and Press the Crust:: First things first, get those Oreos crushed! I usually toss them in my food processor until they’re fine crumbs, but a Ziploc bag and a rolling pin work just as well – and it’s a great stress reliever, honestly. Melt your butter and mix it into the crumbs until it looks like wet sand. Press this mixture firmly into the bottom of a 9-inch springform pan. This is where I always make sure it’s super compact, otherwise, the crust gets crumbly. Pop it in the freezer for at least 20 minutes to set while you get the ice cream ready.
- Soften and Layer Vanilla:: Take your vanilla ice cream out of the freezer about 15-20 minutes before you want to use it. You want it softened enough to spread, but not melted. This is a delicate balance, I tell ya! Spoon the softened vanilla ice cream over your chilled cookie crust, spreading it evenly with an offset spatula. Smooth it out as best you can. I always try to get it perfectly flat, but a little bumpiness is fine. Back into the freezer it goes for at least an hour, or until firm. Don’t rush this, or your layers will bleed!
- Add the Hot Fudge Layer:: Once that vanilla layer is solid, grab your hot fudge sauce. If it’s too thick, warm it gently in the microwave for about 30 seconds. Pour it over the firm vanilla ice cream layer and spread it quickly but carefully. It’s going to chill down fast, so work fast! This step smells so good, that rich chocolatey goodness! I honestly didn’t expect how much this layer would add. Back to the freezer for another 30-60 minutes until the fudge is firm.
- Layer the Chocolate Ice Cream:: Now for the chocolate! Soften your chocolate ice cream just like you did the vanilla. Spread it carefully over the set fudge layer. This part can be a bit tricky if your fudge isn’t totally firm, so make sure it’s ready. Smooth it out, making sure to reach the edges of the pan. I once got impatient and ended up with a swirly mess, which was tasty but not what I was going for. Freeze for at least 2-3 hours, or until rock solid.
- Crown with Whipped Topping:: Once your Homemade Ice Cream Cake is completely frozen and firm, it’s time for the grand finale! Carefully spread your whipped topping over the top chocolate layer. You can make it smooth or create pretty swirls with your spatula. This is where I sometimes get a little messy, but it always looks good in the end. Don’t worry about perfection, just have fun with it! Pop the whole cake back into the freezer for at least another hour to firm up the topping.
- Garnish and Serve Your Homemade Ice Cream Cake:: Before serving, run a knife around the edge of the springform pan, then carefully release the sides. This is a nervous moment for me every time, but it always works out! Now for the fun part: garnish with chocolate sprinkles and a drizzle of caramel sauce, if you’re feeling fancy. The finished Homemade Ice Cream Cake should look like a glorious, layered masterpiece. Slice with a warm knife for clean cuts – a little trick I learned the hard way – and serve immediately. Enjoy your creation!