
October always brings out the witchy baker in me, honestly. I remember one year, trying to find something truly unique for the neighborhood trick-or-treaters, and feeling a bit stumped. My kitchen was a glorious mess of flour and half-eaten candy corn, as it usually is this time of year. Then, I saw a little toy cauldron my niece had left behind, and a spark! What if I could make cookies that looked like those bubbling, mystical pots? It felt a little ambitious, to be real, but the idea of a Halloween Cauldron Cookie Creation just wouldn’t leave me. The smells of cinnamon and vanilla started filling my house, a truly comforting scent amidst the spooky vibes. This dish, or rather, these delightful treats, became a new tradition, full of playful charm.
Oh, the first time I tried this Halloween Cauldron Cookie Creation, I completely forgot to chill the dough. What a disaster! My little cauldrons spread out into amorphous blobs on the baking sheet, looking more like alien puddles than anything magical. I remember laughing so hard, flour dusting my hair and a smear of green food coloring on my cheek, thinking, “Well, that’s not quite right, is it?” It was a valuable lesson in patience and proper chilling, and honestly, the misshapen ones still tasted great!
Halloween Cauldron Cookie Creation Ingredients
- All-Purpose Flour: This is our base, the foundation of our cauldron! Don’t skimp here, it gives the cookies their structure. I’ve tried whole wheat once, and while rustic, it wasn’t quite the tender cookie I was aiming for.
- Unsalted Butter: Creamy, dreamy butter. Make sure it’s softened, not melted, or your dough will be a greasy mess. I usually leave mine on the counter for an hour or so, just until it gives a little when you poke it.
- Granulated Sugar: Sweetness, of course! It also helps with the cookie’s texture. I once accidentally used brown sugar, and while tasty, it gave a chewier, darker cookie that didn’t quite look like a cauldron.
- Large Egg: Binds everything together. Honestly, I’ve had eggs roll off the counter more times than I can count, always when I’m in a hurry!
- Vanilla Extract: A splash of warmth and classic cookie flavor. Good quality vanilla makes a difference, really.
- Baking Powder & Salt: The leavening and flavor enhancers. Don’t forget the salt, it truly balances the sweetness. I’ve definitely made bland cookies by forgetting this simple step.
- Green Gel Food Coloring: This is where the magic happens for our bubbling potion! Gel coloring gives a much more vibrant color than liquid, without thinning your frosting. I once tried liquid, and my potion was more like a weak tea, oops!
- White Chocolate Chips: The base for our potion. They melt so nicely and give a creamy texture. I swear by a good quality brand here, it really makes a difference in how smoothly it melts.
- Mini Marshmallows: These are our adorable little bubbles! They soften and get gooey when added to the warm chocolate, making them look super realistic.
- Black Icing Gel: For the cauldron details. It’s so easy to draw with, even if your hand isn’t super steady (mine rarely is!).
- Edible Glitter (Optional): For that extra sparkly, magical touch. A little shimmer makes these truly enchanting.
Crafting Your Halloween Cauldron Cookie Creation
- Whisking Up the Cauldron Cookie Dough:
- First things first, let’s get that dough going! In a big bowl, cream together your softened butter and granulated sugar until it’s light and fluffy. This usually takes me about 3-5 minutes with a hand mixer, and I love watching it transform. Then, beat in your egg and vanilla extract, really incorporating them well. The mixture should smell so comforting at this point. In a separate bowl, whisk together your flour, baking powder, and salt, making sure there are no lumps. Gradually add the dry ingredients to the wet, mixing until just combined. Honestly, I always forget to scrape down the sides of the bowl, so I’m telling you now: don’t be like me!
- Shaping Those Spooky Cauldrons:
- Now for the fun, slightly messy part! Divide your dough into small, roughly 1.5-inch balls. Place them on a parchment-lined baking sheet. Here’s my trick: use a small, round cookie cutter (about 2 inches) and gently press it down over each dough ball, wiggling it slightly to create a thick, round cookie with a slight indentation in the middle. This forms the cauldron shape! Don’t press too hard, we want a little well for our potion. I remember one time I pressed too hard, and the dough stuck to the cutter, turning into a flat mess. Learn from my oops moment! Pop these shaped beauties into the fridge for at least 30 minutes. Chilling is crucial for maintaining that cauldron shape, trust me.
- Baking Your Cookie Potions:
- Preheat your oven to 350°F (175°C). Bake your chilled cauldron cookies for about 10-12 minutes, or until the edges are just barely golden. They should still be soft in the center when you pull them out. This step always smells so good, like a classic sugar cookie baking! Once out of the oven, let them cool on the baking sheet for a few minutes before transferring them to a wire rack to cool completely. Patience is a virtue here, trying to decorate warm cookies just leads to melted frosting and sadness.
- Mixing the Bubbling “Potion”:
- Time to make our magical potion! In a small microwave-safe bowl, melt your white chocolate chips in 30-second intervals, stirring in between, until smooth. This usually takes me about 1-2 minutes total. Be careful not to overheat it, or it’ll seize up and become grainy I’ve done that, and it’s so frustrating! Once melted, stir in a few drops of green gel food coloring until you get that vibrant, witchy green you’re looking for. I like a really bright green, but you can adjust to your preference. This is where the kitchen really starts to feel like a mad scientist’s lab!
- Adding the Sparkle and Black Icing:
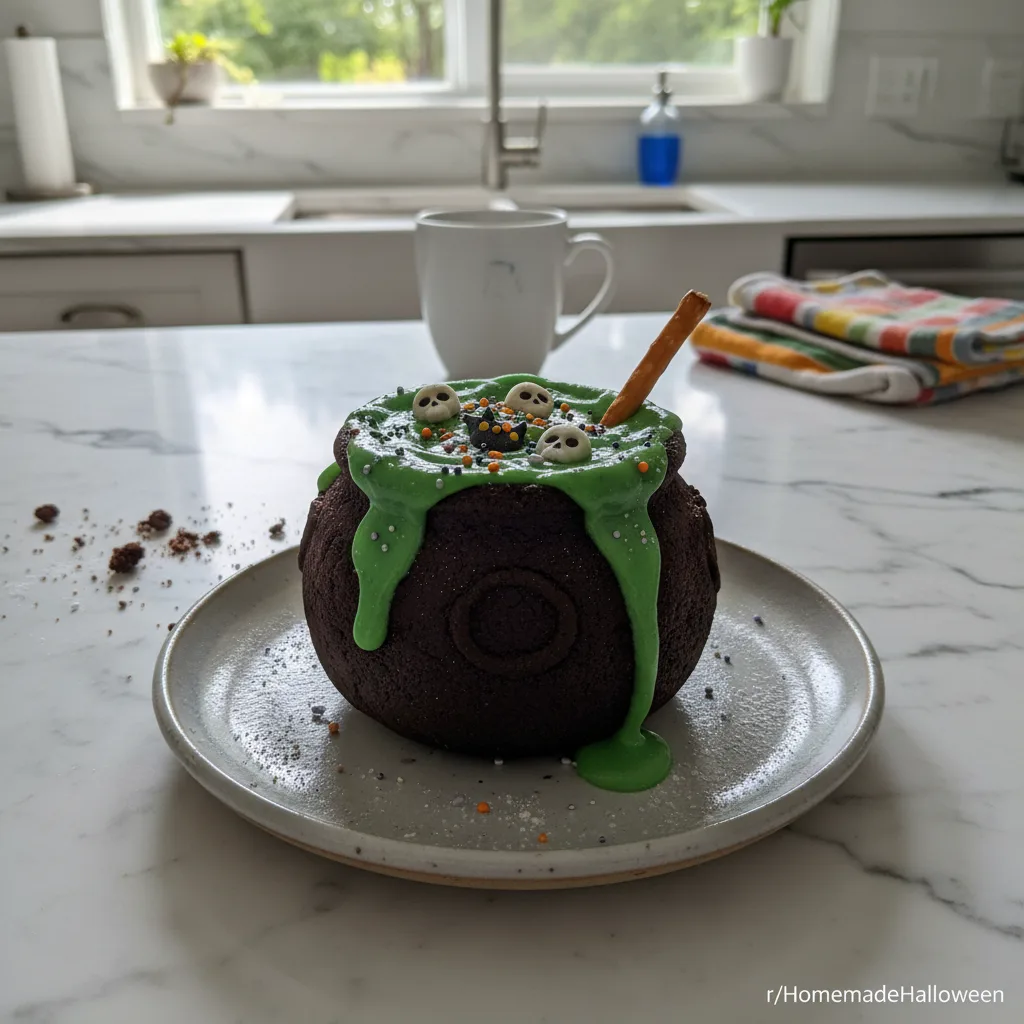
- Once your cookies are completely cool, spoon a small amount of the green chocolate potion into the indentation of each cauldron cookie. Work quickly, as it sets fairly fast. While the chocolate is still wet, gently place 2-3 mini marshmallows on top for those bubbling effects. If you’re feeling fancy, sprinkle a tiny bit of edible glitter over the green chocolate for an extra magical shimmer! Then, use your black icing gel to draw the little cauldron handles and maybe some spooky details around the edges. Don’t worry if it’s not perfect, the charm is in the handmade look!
- The Grand Finale: A Halloween Cauldron Cookie Creation!:
- Let your Halloween Cauldron Cookie Creation set completely. This usually takes about 30 minutes at room temperature, or you can pop them in the fridge for 10-15 minutes to speed things up. Once set, these adorable, spooky treats are ready to be devoured! The combination of the tender cookie, creamy white chocolate, and gooey marshmallows is just delightful. I love seeing the kids’ faces light up when they see these, it’s truly the best part of the whole process. They’re so much fun to make and even more fun to eat!
Making these cookies often involves a little bit of green chocolate on my nose and flour on the floor, but that’s just part of the charm, right? One year, my cat, Luna, tried to “help” by batting at a marshmallow, sending it flying across the kitchen. It was pure chaos, but also a moment I’ll always remember. This Halloween Cauldron Cookie Creation truly embodies the playful, slightly messy spirit of the season, and honestly, that’s why I love them so much.
Storing Your Halloween Cauldron Cookie Creation
These Halloween Cauldron Cookie Creation treats keep pretty well, which is great if you’re making them ahead for a party. I usually store them in an airtight container at room temperature for up to a week. Honestly, they rarely last that long around here, but it’s good to know! If you stack them, put a piece of parchment paper between layers to prevent the chocolate potion from sticking or getting smudged. I’ve definitely stacked them too soon once, and the marshmallows stuck to the bottoms of the cookies above them not ideal, but still tasty! If your kitchen is super warm, or if you want them to last a bit longer, you can pop the container in the fridge, but let them come to room temperature for about 15 minutes before serving for the best texture. Freezing isn’t really ideal for these because of the melted chocolate and marshmallows, they just don’t hold up their texture as well after thawing, I’ve found.

Personalizing Your Halloween Cauldron Cookie Creation
I’ve played around with substitutions for this Halloween Cauldron Cookie Creation quite a bit! No green food coloring? Blue or purple works for a different potion vibe! I’ve done a wicked purple brew before, and it looked just as spooky. You could also use dark chocolate instead of white for a richer, more intense cauldron, though the green coloring might not pop as much. I tried that once, and while delicious, the potion looked a bit murky, kinda like swamp water, which, hey, could be a look! For the marshmallows, if you can’t find mini ones, you can snip larger marshmallows with kitchen shears, though it’s a bit more fiddly. I’ve also swapped out vanilla extract for almond extract for a slightly different flavor profile, which was surprisingly good, giving it a subtle, nutty note. Don’t be afraid to experiment with edible glitter colors too silver or gold would be equally enchanting!
Serving Up Your Halloween Cauldron Cookie Creation
These Halloween Cauldron Cookie Creation treats are truly the stars of any Halloween spread! I love arranging them on a dark, rustic platter, it really makes those vibrant colors pop, like they’re truly bubbling. They’re fantastic on their own, but if you’re hosting a party, consider serving them alongside a big bowl of spooky punch (my blood-orange concoction is a hit!) or even a warm mug of spiced cider. For a fun dessert table, I pair them with ghost-shaped brownies and mummy-wrapped hot dogs for a full-on spooky feast. Honestly, a plate of these, a good scary movie, and a cozy blanket? Yes please. They just scream festive fun, and everyone always asks for the recipe. They’re perfect for school parties, office potlucks, or just a fun afternoon baking with the kiddos.
The Backstory of My Halloween Cauldron Cookie Creation
For me, Halloween baking has always been about bringing a little bit of magic into the kitchen. The idea for this Halloween Cauldron Cookie Creation really stemmed from wanting to capture that whimsical, slightly mischievous spirit of the holiday in an edible form. Growing up, my grandma always made the most elaborate holiday treats, and her kitchen was a wonderland of smells and sights. I wanted to create something that evoked that same feeling of enchantment and wonder. While these cookies don’t have a deep historical root, they’re born from a desire to make new, joyful traditions. It’s about tapping into that childlike excitement for costumes, candy, and a touch of the supernatural. This recipe is a nod to all those fun, spooky memories, and a way to create new ones, one bubbling cookie at a time. It’s a little piece of my own personal Halloween lore, really.
And there you have it, my latest Halloween Cauldron Cookie Creation! It’s such a simple way to bring a little bit of playful magic into your kitchen this season. Seeing those little bubbling cauldrons, each one slightly imperfect but full of charm, always makes me smile. I hope you give them a whirl and maybe even create your own kitchen chaos along the way. Don’t forget to share your own spooky versions with me, I love seeing what you all cook up!

Halloween Cauldron Cookie Creation FAQs
- → Can I make the cookie dough ahead of time?
Oh, absolutely! I often make the dough a day or two in advance. Just wrap it tightly in plastic wrap and keep it in the fridge. It actually helps the flavors meld, and it’s one less thing to do on baking day!
- → Can I use different colors for the “potion”?
Yes, please do! I’ve tried purple, orange, and even a spooky black potion. Just swap out the green gel food coloring for your favorite spooky shade. It works just as well and lets you customize your Halloween Cauldron Cookie Creation!
- → My cookies spread too much, what did I do wrong?
Ah, that’s usually a sign the dough wasn’t chilled enough! Or, your butter might have been too warm. Make sure the dough is nice and firm before baking, and your butter is softened, not melted. I’ve had many a flat cookie from rushing this step!
- → How do I store leftover Halloween Cauldron Cookie Creation?
Just pop them into an airtight container at room temperature. They’ll stay good for about 5-7 days. I wouldn’t recommend freezing them, as the marshmallows can get a bit weird after thawing, from my own experience!
- → Can I add other decorations to my cauldron cookies?
Definitely! I’ve added candy eyes, tiny sprinkles, and even little edible spiders. Get creative! It’s your Halloween Cauldron Cookie Creation, so make it as spooky or as cute as you like. Sometimes, a little extra sparkle makes all the difference!

Spooky Halloween Cauldron Cookie Creation Fun
- Prep Time: 30 Minutes
- Cook Time: 12 Minutes
- Total Time: 42 Minutes
- Yield: 18 Servings 1x
- Category: Dinners
Description
Conjure up magic with this Halloween Cauldron Cookie Creation! Learn to make adorable, bubbling cauldron cookies, perfect for spooky treats.
Ingredients
- Cauldron Cookie Base:
- 2 ½ cups all-purpose flour
- 1 cup unsalted butter, softened
- ¾ cup granulated sugar
- 1 large egg
- 1 tsp vanilla extract
- 1 tsp baking powder
- ½ tsp salt
- Potion & Bubbles:
- 1 cup white chocolate chips
- Green gel food coloring
- ½ cup mini marshmallows
- Sparkle & Shine:
- Black icing gel (for details)
- Edible glitter (optional)
Instructions
- Whisking Up the Cauldron Cookie Dough: First things first, let’s get that dough going! In a big bowl, cream together your softened butter and granulated sugar until it’s light and fluffy. This usually takes me about 3-5 minutes with a hand mixer, and I love watching it transform. Then, beat in your egg and vanilla extract, really incorporating them well. The mixture should smell so comforting at this point. In a separate bowl, whisk together your flour, baking powder, and salt, making sure there are no lumps. Gradually add the dry ingredients to the wet, mixing until just combined. Honestly, I always forget to scrape down the sides of the bowl, so I’m telling you now: don’t be like me!
- Shaping Those Spooky Cauldrons: Now for the fun, slightly messy part! Divide your dough into small, roughly 1.5-inch balls. Place them on a parchment-lined baking sheet. Here’s my trick: use a small, round cookie cutter (about 2 inches) and gently press it down over each dough ball, wiggling it slightly to create a thick, round cookie with a slight indentation in the middle. This forms the cauldron shape! Don’t press too hard, we want a little well for our potion. I remember one time I pressed too hard, and the dough stuck to the cutter, turning into a flat mess. Learn from my oops moment! Pop these shaped beauties into the fridge for at least 30 minutes. Chilling is crucial for maintaining that cauldron shape, trust me.
- Baking Your Cookie Potions: Preheat your oven to 350°F (175°C). Bake your chilled cauldron cookies for about 10-12 minutes, or until the edges are just barely golden. They should still be soft in the center when you pull them out. This step always smells so good, like a classic sugar cookie baking! Once out of the oven, let them cool on the baking sheet for a few minutes before transferring them to a wire rack to cool completely. Patience is a virtue here; trying to decorate warm cookies just leads to melted frosting and sadness.
- Mixing the Bubbling “Potion”: Time to make our magical potion! In a small microwave-safe bowl, melt your white chocolate chips in 30-second intervals, stirring in between, until smooth. This usually takes me about 1-2 minutes total. Be careful not to overheat it, or it’ll seize up and become grainy – I’ve done that, and it’s so frustrating! Once melted, stir in a few drops of green gel food coloring until you get that vibrant, witchy green you’re looking for. I like a really bright green, but you can adjust to your preference. This is where the kitchen really starts to feel like a mad scientist’s lab!
- Adding the Sparkle and Black Icing: Once your cookies are completely cool, spoon a small amount of the green chocolate potion into the indentation of each cauldron cookie. Work quickly, as it sets fairly fast. While the chocolate is still wet, gently place 2-3 mini marshmallows on top for those bubbling effects. If you’re feeling fancy, sprinkle a tiny bit of edible glitter over the green chocolate for an extra magical shimmer! Then, use your black icing gel to draw the little cauldron handles and maybe some spooky details around the edges. Don’t worry if it’s not perfect, the charm is in the handmade look!
- The Grand Finale: A Halloween Cauldron Cookie Creation!: Let your Halloween Cauldron Cookie Creation set completely. This usually takes about 30 minutes at room temperature, or you can pop them in the fridge for 10-15 minutes to speed things up. Once set, these adorable, spooky treats are ready to be devoured! The combination of the tender cookie, creamy white chocolate, and gooey marshmallows is just delightful. I love seeing the kids’ faces light up when they see these; it’s truly the best part of the whole process. They’re so much fun to make and even more fun to eat!


