Description
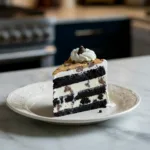
Chocolate Chip Cookie Ice Cream Cake is pure joy! Layers of chewy cookies, rich ice cream, and chocolate fudge. So easy to make, even with kitchen chaos.
Ingredients
Scale
- Base & Layers:
- 24–30 chewy chocolate chip cookies (store-bought or homemade)
- 1.5 quarts (about 6 cups) vanilla ice cream, softened slightly
- 1 cup hot fudge sauce, warmed
- Flavor & Texture Boosters:
- 1 (8 ounce) container whipped topping, thawed (or 2 cups fresh whipped cream)
- Garnish & Toppings:
- 1/4 cup mini chocolate chips
- 2 tablespoons sprinkles (optional, but fun!)
Instructions
- Prep Your Pan & Cookie Base.: First things first, grab a 9-inch springform pan. Line the bottom with parchment paper – trust me, it makes serving a dream. Now, take about half of your chocolate chip cookies and arrange them tightly on the bottom. Don’t worry if they don’t fit perfectly; you can break a few to fill in the gaps. I always end up with a few rogue crumbs, but that’s just part of the charm, right? Pop that in the freezer for about 10 minutes while you get the ice cream ready.
- First Ice Cream Layer.: While your cookie base is chilling, let your vanilla ice cream soften on the counter for about 15-20 minutes. It needs to be scoopable but not completely melted. This is where I learned patience the hard way! Once it’s the right consistency, spread half of it evenly over your chilled cookie layer. Use an offset spatula or the back of a spoon to get it nice and smooth. It should smell like pure vanilla goodness, a lovely anticipation.
- Drizzle That Fudge.: Now for the fun part! Warm your hot fudge sauce slightly so it’s easy to drizzle. Spoon about half of the fudge over the ice cream layer. You don’t need to spread it perfectly; a nice swirly pattern looks fantastic. I honestly love this step because the contrast of the dark fudge against the light ice cream is just so visually appealing. A little extra drizzle never hurt anyone, just saying!
- Second Cookie Layer.: Time for another layer of those glorious chocolate chip cookies! Arrange the remaining cookies over the fudge layer. Again, break them to fit if you need to. I usually try to make this layer a bit more uniform, but honestly, a few cracks just show it’s homemade. This layer adds that essential chewy texture that makes this dessert so satisfying.
- Second Ice Cream Layer.: Spread the remaining softened vanilla ice cream over the second cookie layer, making sure to cover all the cookies right up to the edges of the pan. This is your top, smooth layer, so try to make it as even as possible. I always take a moment to admire the layers forming, a little proud baker moment, you know? The kitchen might be a bit sticky by now, but it’s all worth it.
- Freeze & Decorate.: Cover the springform pan tightly with plastic wrap and pop it into the freezer for at least 4-6 hours, or even better, overnight. This cake needs to be solid. Once it’s firm, remove it from the freezer, carefully release the springform pan, and peel off the parchment paper. Now, for the grand finale: drizzle with the remaining hot fudge, sprinkle with mini chocolate chips, and don’t forget those sprinkles! Slice and serve immediately. It’s truly a showstopper!