
Oh, honestly, there are some desserts that just scream pure joy, right? For me, it’s this Chocolate Chip Cookie Ice Cream Cake. I first stumbled upon a version of this goodness at a friend’s potluck years ago. It was a scorching summer day, and her kitchen was a beautiful mess of melting ice cream tubs and cookie crumbs. I remember thinking, ‘Wait, you just… stack these things?’ It felt like a culinary revelation, a dessert that didn’t demand perfection, just pure, unadulterated fun. This cake isn’t just about layers, it’s about those easy, breezy moments, the kind where you don’t mind a little ice cream drip because, honestly, it just means you’re living your best dessert life.
I remember one time, I was trying to rush the ice cream softening process big mistake. I ended up with a runny, soupy mess that refused to layer. My kitchen looked like an ice cream truck exploded, and I just stood there, spatula in hand, wondering if I should just call it a day and eat the cookies plain. But hey, we learn, right? Now, I know patience is key for a beautifully layered Chocolate Chip Cookie Ice Cream Cake.
Ingredients for Your Chocolate Chip Cookie Ice Cream Cake
- Chocolate Chip Cookies: Use good quality ones, honestly. I’ve tried baking my own from scratch for this, and while delicious, it added an extra layer of chaos I didn’t need. Store-bought, chewy ones are my secret weapon here, like Tate’s Bake Shop or your favorite bakery’s. Don’t go for the super crunchy kind, they just crumble too much.
- Vanilla Ice Cream: Go for a rich, full-fat vanilla bean. Please, for the love of all that is delicious, don’t use the ‘light’ stuff. It just doesn’t get that creamy texture we’re aiming for. I once used a budget brand, and it turned icy and sad. Learn from my mistakes!
Hot Fudge Sauce: A good quality jarred hot fudge works wonders. I’ve tried making my own, and it’s fantastic, but sometimes, convenience wins. Just warm it up slightly so it drizzles beautifully. The smell of warm fudge is honestly my favorite kitchen aroma.
Whipped Topping: Cool Whip is totally fine here, or if you’re feeling fancy, make some fresh whipped cream. I often use Cool Whip because it holds its shape so well in the freezer, and honestly, who needs extra fuss?
Mini Chocolate Chips: These are for sprinkling, for a little extra chocolatey bite. I always have a bag in my pantry, they’re just so versatile. They add a lovely texture contrast to the creamy ice cream and soft cookies.
- Sprinkles (optional, but highly recommended): Because what’s a celebration without sprinkles? I love a good rainbow mix, but chocolate sprinkles work too. They just make everything look happier, don’t they?
Assembling Your Chocolate Chip Cookie Ice Cream Cake
- Step 1: Prep Your Pan & Cookie Base.
- First things first, grab a 9-inch springform pan. Line the bottom with parchment paper trust me, it makes serving a dream. Now, take about half of your chocolate chip cookies and arrange them tightly on the bottom. Don’t worry if they don’t fit perfectly, you can break a few to fill in the gaps. I always end up with a few rogue crumbs, but that’s just part of the charm, right? Pop that in the freezer for about 10 minutes while you get the ice cream ready.
- Step 2: First Ice Cream Layer.
- While your cookie base is chilling, let your vanilla ice cream soften on the counter for about 15-20 minutes. It needs to be scoopable but not completely melted. This is where I learned patience the hard way! Once it’s the right consistency, spread half of it evenly over your chilled cookie layer. Use an offset spatula or the back of a spoon to get it nice and smooth. It should smell like pure vanilla goodness, a lovely anticipation.
- Step 3: Drizzle That Fudge.
- Now for the fun part! Warm your hot fudge sauce slightly so it’s easy to drizzle. Spoon about half of the fudge over the ice cream layer. You don’t need to spread it perfectly, a nice swirly pattern looks fantastic. I honestly love this step because the contrast of the dark fudge against the light ice cream is just so visually appealing. A little extra drizzle never hurt anyone, just saying!
- Step 4: Second Cookie Layer.
- Time for another layer of those glorious chocolate chip cookies! Arrange the remaining cookies over the fudge layer. Again, break them to fit if you need to. I usually try to make this layer a bit more uniform, but honestly, a few cracks just show it’s homemade. This layer adds that essential chewy texture that makes this dessert so satisfying.
- Step 5: Second Ice Cream Layer.
- Spread the remaining softened vanilla ice cream over the second cookie layer, making sure to cover all the cookies right up to the edges of the pan. This is your top, smooth layer, so try to make it as even as possible. I always take a moment to admire the layers forming, a little proud baker moment, you know? The kitchen might be a bit sticky by now, but it’s all worth it.
- Step 6: Freeze & Decorate.
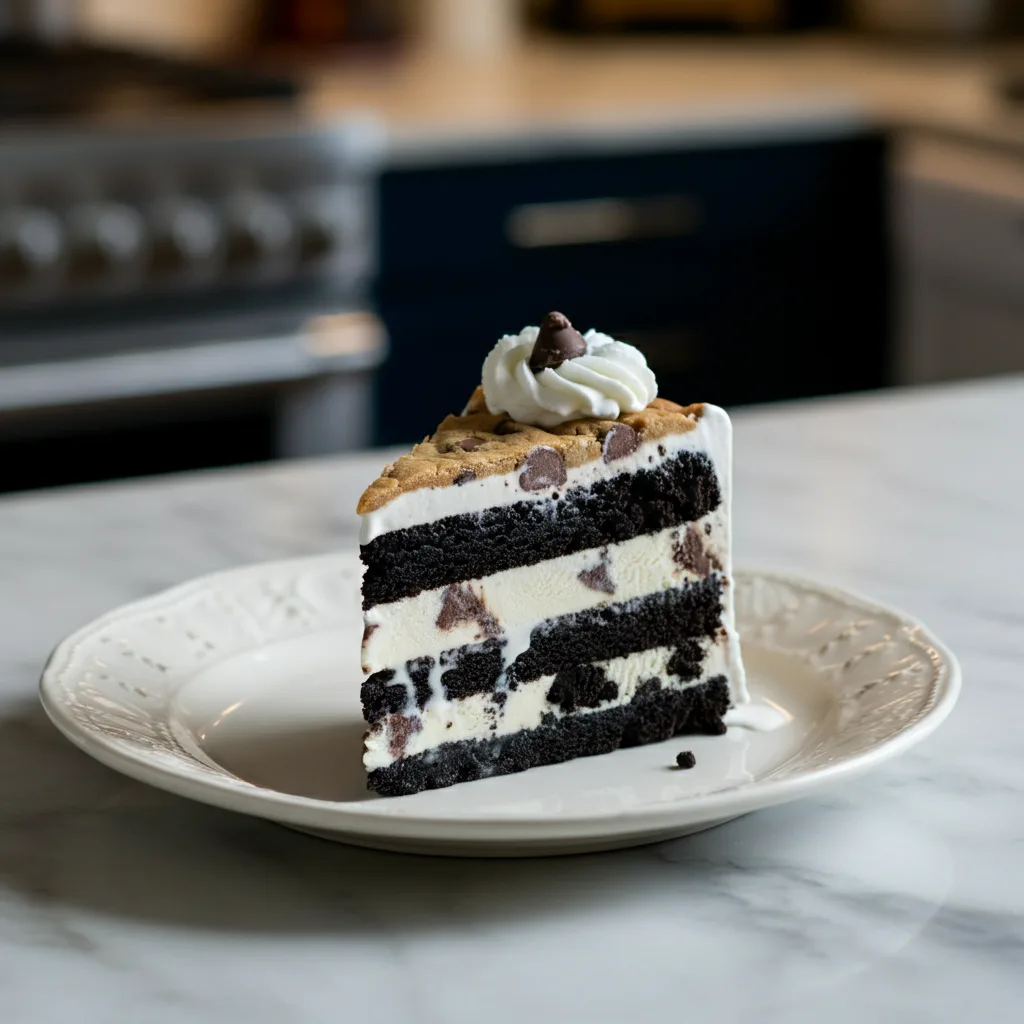
- Cover the springform pan tightly with plastic wrap and pop it into the freezer for at least 4-6 hours, or even better, overnight. This cake needs to be solid. Once it’s firm, remove it from the freezer, carefully release the springform pan, and peel off the parchment paper. Now, for the grand finale: drizzle with the remaining hot fudge, sprinkle with mini chocolate chips, and don’t forget those sprinkles! Slice and serve immediately. It’s truly a showstopper!
There’s something so nostalgic about making this dessert. It brings me back to those carefree summer days. I remember one time, my little niece was ‘helping’ me, and she ended up with more ice cream on her face than in the cake. It was a sweet, sticky mess, but those are the memories that make cooking so special. It’s not always about perfection, it’s about the joy and the chaos.
Storing Your Chocolate Chip Cookie Ice Cream Cake
This Chocolate Chip Cookie Ice Cream Cake is a freezer superstar! Once assembled and frozen, you can keep it covered tightly with plastic wrap (and then aluminum foil for extra protection against freezer burn) in the freezer for up to 2-3 weeks. I’ve had it last even longer, honestly, but the texture is best within that timeframe. When you’re ready to serve, just pull it out, let it sit for a few minutes to soften slightly (about 5-10 minutes), and then slice. I once tried to microwave a slice to speed up the softening, and it turned into a sad, melty puddle. So, don’t do that, lol. Slow and steady wins the race with this one. It’s a fantastic make-ahead dessert, which is why I love it so much for parties.

Ingredient Substitutions for Chocolate Chip Cookie Ice Cream Cake
Okay, so I’ve played around with this Chocolate Chip Cookie Ice Cream Cake recipe a bit, and here’s what I’ve learned. If vanilla ice cream isn’t your jam, chocolate, coffee, or even mint chip ice cream can work! I tried chocolate once, and it was good, but it made the cake feel a bit too heavy for my taste. For the cookies, any sturdy, chewy cookie will do oatmeal raisin or even peanut butter cookies could be interesting, though I haven’t gone quite that far yet! As for the hot fudge, a good caramel sauce could also be a delicious swap, giving it a whole new vibe. I haven’t tried a dairy-free version, to be real, but I imagine using a good quality dairy-free ice cream and whipped topping would work just fine if you need that option.
Serving Suggestions for Chocolate Chip Cookie Ice Cream Cake
Honestly, this Chocolate Chip Cookie Ice Cream Cake is a showstopper all on its own. But if you want to elevate the experience, a little extra something never hurts. I love serving slices with a side of fresh berries the tartness cuts through the richness beautifully. A small glass of cold milk is the classic pairing, bringing back all those childhood dessert vibes. For a more grown-up moment, a drizzle of espresso or a small shot of Kahlúa over your slice can be surprisingly delightful. This cake is perfect for birthday parties, summer barbecues, or honestly, just a Tuesday night when you need a little pick-me-up. It’s a dessert that screams ‘celebration’ no matter the occasion!
Cultural Backstory
While this Chocolate Chip Cookie Ice Cream Cake doesn’t have a deep, ancient cultural history, its roots are firmly planted in American nostalgia and the pure joy of combining two beloved desserts: the classic chocolate chip cookie and creamy ice cream. It really gained popularity in the mid-20th century as home cooks got creative with easy, no-bake desserts. For me, it connects to my own childhood memories of summer parties where ice cream cakes were the ultimate treat. It was always the first thing to disappear! It’s a testament to how simple ingredients, brought together with a little love, can create something truly special that transcends generations and just makes everyone happy.
Honestly, making this dessert always fills me with such warmth. It’s more than just a recipe, it’s a little slice of happiness, a reminder that sometimes the simplest things bring the most joy. When I pull it out of the freezer, all layered and beautiful, I can’t help but smile. It never fails to bring happy faces to the table. I really hope you give this a try and maybe even share your own kitchen chaos moments with me. Happy baking (or, well, assembling)!

Frequently Asked Questions
- → Can I use homemade cookies for this dessert?
Absolutely! I’ve done it, and while it adds an extra step, the flavor is incredible. Just make sure your cookies are completely cooled before assembling, or they’ll melt your ice cream too fast. I once tried to use warm ones, and it was a mess, honestly!
- → What if my ice cream is too hard to spread?
Just let it sit on the counter for a bit longer! Don’t try to microwave it or force it. Patience is your friend here. It should be soft enough to spread easily but not soupy. I’ve been there, trying to wrestle rock-hard ice cream, and it’s just not worth it.
- → How do I get clean slices of this cake?
Here’s my trick: run a sharp knife under hot water for a few seconds, wipe it dry, then make your cut. Repeat for each slice. It helps the knife glide through the frozen layers without sticking. Trust me, it makes a huge difference!
- → Can I make this dessert ahead of time?
Yes, please do! This is one of those desserts that actually benefits from being made ahead. It needs at least 4-6 hours to freeze solid, but I usually make it the day before. It gives all those layers time to really meld together beautifully.
- → Can I add other mix-ins to the Chocolate Chip Cookie Ice Cream Cake?
Oh, totally! Get creative! I’ve seen people add crushed candy bars, chopped nuts, or even a layer of brownie bits. Just make sure whatever you add is freezer-friendly. I once added fresh fruit, and it got a bit icy, so stick to things that freeze well.

Creamy Chocolate Chip Cookie Ice Cream Cake
- Prep Time: 25 Minutes
- Cook Time: 0 Minutes
- Total Time: 4 Hours 25 Minutes
- Yield: 8 Servings 1x
- Category: Baking Recipes
Description
Chocolate Chip Cookie Ice Cream Cake is pure joy! Layers of chewy cookies, rich ice cream, and chocolate fudge. So easy to make, even with kitchen chaos.
Ingredients
- Base & Layers:
- 24–30 chewy chocolate chip cookies (store-bought or homemade)
- 1.5 quarts (about 6 cups) vanilla ice cream, softened slightly
- 1 cup hot fudge sauce, warmed
- Flavor & Texture Boosters:
- 1 (8 ounce) container whipped topping, thawed (or 2 cups fresh whipped cream)
- Garnish & Toppings:
- 1/4 cup mini chocolate chips
- 2 tablespoons sprinkles (optional, but fun!)
Instructions
- Prep Your Pan & Cookie Base.: First things first, grab a 9-inch springform pan. Line the bottom with parchment paper – trust me, it makes serving a dream. Now, take about half of your chocolate chip cookies and arrange them tightly on the bottom. Don’t worry if they don’t fit perfectly; you can break a few to fill in the gaps. I always end up with a few rogue crumbs, but that’s just part of the charm, right? Pop that in the freezer for about 10 minutes while you get the ice cream ready.
- First Ice Cream Layer.: While your cookie base is chilling, let your vanilla ice cream soften on the counter for about 15-20 minutes. It needs to be scoopable but not completely melted. This is where I learned patience the hard way! Once it’s the right consistency, spread half of it evenly over your chilled cookie layer. Use an offset spatula or the back of a spoon to get it nice and smooth. It should smell like pure vanilla goodness, a lovely anticipation.
- Drizzle That Fudge.: Now for the fun part! Warm your hot fudge sauce slightly so it’s easy to drizzle. Spoon about half of the fudge over the ice cream layer. You don’t need to spread it perfectly; a nice swirly pattern looks fantastic. I honestly love this step because the contrast of the dark fudge against the light ice cream is just so visually appealing. A little extra drizzle never hurt anyone, just saying!
- Second Cookie Layer.: Time for another layer of those glorious chocolate chip cookies! Arrange the remaining cookies over the fudge layer. Again, break them to fit if you need to. I usually try to make this layer a bit more uniform, but honestly, a few cracks just show it’s homemade. This layer adds that essential chewy texture that makes this dessert so satisfying.
- Second Ice Cream Layer.: Spread the remaining softened vanilla ice cream over the second cookie layer, making sure to cover all the cookies right up to the edges of the pan. This is your top, smooth layer, so try to make it as even as possible. I always take a moment to admire the layers forming, a little proud baker moment, you know? The kitchen might be a bit sticky by now, but it’s all worth it.
- Freeze & Decorate.: Cover the springform pan tightly with plastic wrap and pop it into the freezer for at least 4-6 hours, or even better, overnight. This cake needs to be solid. Once it’s firm, remove it from the freezer, carefully release the springform pan, and peel off the parchment paper. Now, for the grand finale: drizzle with the remaining hot fudge, sprinkle with mini chocolate chips, and don’t forget those sprinkles! Slice and serve immediately. It’s truly a showstopper!


