
Okay, so picture this: it’s late October, the air is crisp, and my kids are bouncing off the walls, demanding “spooky treats” that I, honestly, hadn’t even thought about. My kitchen was, as usual, a delightful chaos of half-finished projects and forgotten grocery lists. That’s when I stumbled upon the idea for these 3-Ingredient Halloween Dessert Cups. I mean, three ingredients? It sounded too good to be true, like a whispered secret from a busy parent fairy godmother. I remember grabbing a few things from the pantry, skeptical but hopeful. The first time I made them, the smell of chocolate and the promise of something easy just filled the air, and suddenly, the pre-Halloween frenzy felt a little less frantic. These aren’t just dessert cups, they’re a little cup of calm in the storm of holiday prep.
The very first time I made these, I was so focused on getting the “dirt” layer just right that I completely forgot to chill the pudding. I layered it all up, proud of my speedy work, only to watch the cookie crumbs slowly sink into the still-liquid chocolate goo. It was a delicious, albeit messy, chocolate soup! My youngest, bless her heart, called it “swamp monster pudding.” We still ate it, of course, but now I always, always, give that pudding a proper chill time. Live and learn, right?
Ingredients for Easy Halloween Dessert Cups
- Instant Chocolate Pudding Mix: Honestly, don’t skimp here. I’ve tried the generic stuff and it just doesn’t have that deep, rich chocolate hug. Jell-O brand, for me, is the way to go, it’s what my grandma used, and who am I to argue with tradition? It gives that perfect creamy base, you know, the kind that makes these dessert cups truly special.
- Whole Milk: This is crucial for the pudding! I once thought, “Oh, skim milk will be fine,” and it was NOT. The pudding was watery and sad, like a ghost of its former self. Learn from my mistake, use whole milk for that luscious, thick texture. It really makes a difference, trust me, for a truly decadent base.
Chocolate Sandwich Cookies (like Oreos): These are the star for that “dirt” layer! I usually just grab a family pack of Oreos because, let’s be real, some will disappear before they even make it to the food processor. They add that perfect crunch and a familiar chocolatey goodness. Don’t worry about getting them perfectly fine, some chunky bits are actually great for texture in these Halloween treats!
Frozen Whipped Topping (like Cool Whip): Okay, I know some folks are purists, but for a quick 3-Ingredient Halloween Dessert Cups recipe, Cool Whip is a lifesaver. It holds its shape beautifully and tastes like a cloud! I tried making fresh whipped cream once for these, and it just didn’t stand up as well for kids digging in. Plus, it’s already sweetened, one less thing to worry about!
Crafting Your 3-Ingredient Halloween Dessert Cups
- Crush Those Cookies:
- Grab those chocolate sandwich cookies, about 15-20 of them, and pop them into a sturdy Ziploc bag the freezer kind, not the flimsy sandwich ones, trust me! Now, here’s the fun part (or the stress relief, depending on your day!) smash ’em! Use a rolling pin, the back of a spoon, or even your fist. I once got a little too enthusiastic and tore a hole in the bag, sending cookie shrapnel everywhere. Oops! Aim for fine crumbs with a few small chunks for texture. Set those aside, they’re going to be our spooky “dirt.”
- Whip Up the Pudding Magic:
- In a medium bowl, combine your instant chocolate pudding mix with the cold whole milk. Get out your whisk and just go for it! Whisk vigorously for about 2 minutes. You’ll feel it start to thicken almost immediately, which honestly, always feels like kitchen magic to me. Don’t stop too soon, you want it nice and thick, not watery. This is your creamy, dreamy base for your spooky cups!
- Chill Out, Pudding:
- Once your pudding is thick and luscious, cover the bowl with plastic wrap and pop it into the fridge. Let it chill for at least 5 minutes, or even longer if you’ve got the time. This little rest makes it even firmer and easier to layer. I’ve definitely been impatient and tried to layer it too soon, only for everything to sink into a chocolatey mess. Learn from my mistakes, a little chill time is your friend!
- Assemble Your Spooky Layers:
- Now for the fun part: assembly! Grab your serving cups I love clear ones so you can see all the layers. Start with a generous spoonful of your crushed cookie “dirt” at the bottom of each cup. Then, gently spoon in a layer of that rich chocolate pudding. Don’t worry if it’s not perfectly neat, a little rustic charm is part of the fun, right? I always tell myself it adds character to these easy Halloween treats!
- Layer More Dirt & Fluff:
- Next, sprinkle another layer of cookie crumbs over the pudding. This is where you can get creative and decide how “dirty” you want your dessert cups to be! Then, top that with a generous dollop of your frozen whipped topping. I usually use a spoon, but if you’re feeling fancy, a piping bag with a star tip makes them look extra special. I once tried to pipe with a Ziploc bag and it burst, whipped topping everywhere! Total kitchen chaos, but still delicious.
- Garnish & Serve Your 3-Ingredient Halloween Dessert Cups:
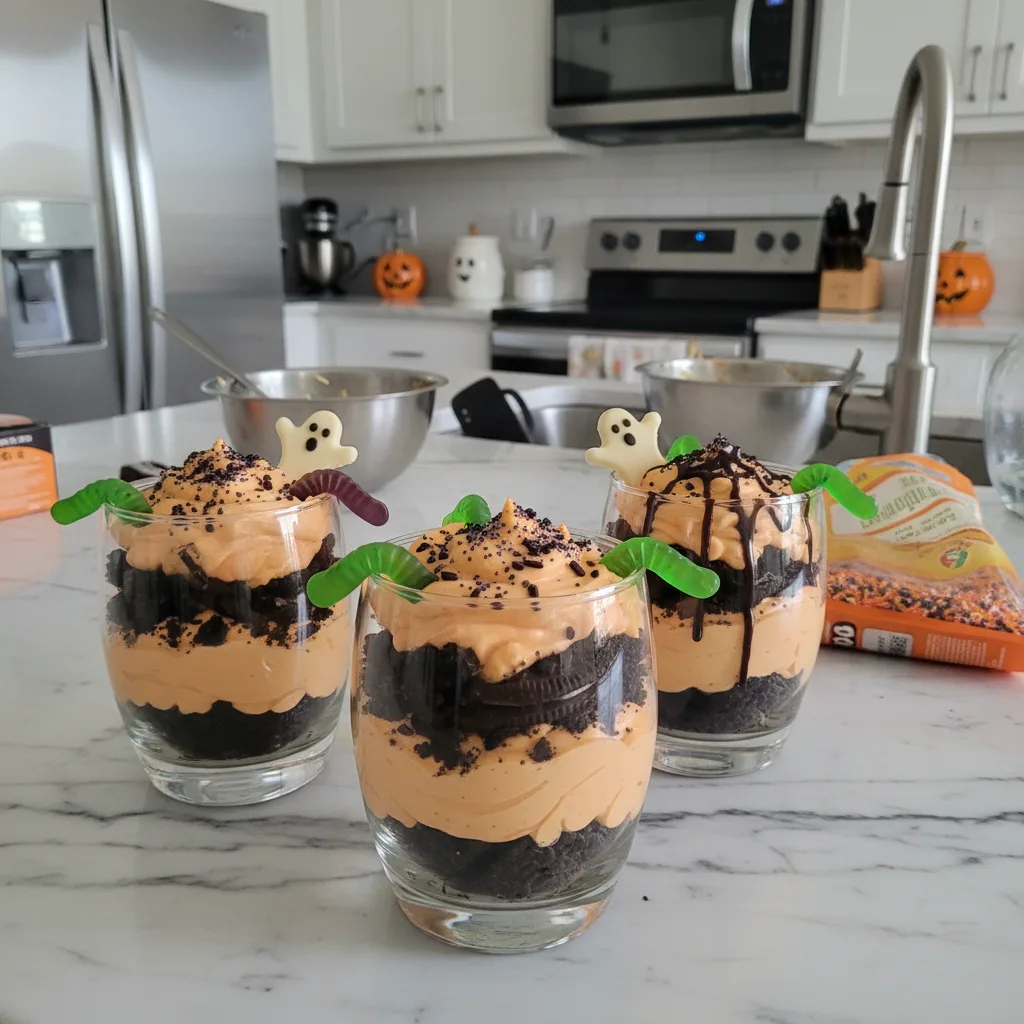
- For the final touch, sprinkle a few more cookie crumbs on top of the whipped topping. If you have any fun Halloween candies, like gummy worms peeking out or candy corn, now’s the time to add them for extra spooky flair. These are best served immediately or chilled for a bit longer. Seeing those layers come together, honestly, it always makes me smile and feel like a kitchen wizard!
Making these 3-Ingredient Halloween Dessert Cups always brings me back to simpler times, honestly. There’s something so satisfying about creating something fun and delicious with minimal fuss. I remember one year, my kids decided to add green food coloring to the whipped topping to make “monster goo.” It looked wild, but they had a blast, and that’s what cooking together is all about, right? Embrace the mess, embrace the creativity, and just have fun with it!

Ingredient Substitutions for 3-Ingredient Halloween Dessert Cups
Life happens, and sometimes you don’t have exactly what the recipe calls for, right? I’ve been there! For the chocolate sandwich cookies, I’ve tried using crushed graham crackers once when I was desperate, and it worked… kinda. It wasn’t quite the same spooky “dirt” vibe, but it was still tasty! Vanilla wafers would also be a decent swap, though again, less “dirt-like.” As for the instant chocolate pudding, if you only have vanilla on hand, go for it! You could even add a tiny bit of cocoa powder to the vanilla pudding for a makeshift chocolatey flavor. And if you’re out of frozen whipped topping, you could whip up some heavy cream with a bit of powdered sugar and vanilla, but remember, it won’t hold its shape quite as long. I’ve also seen people use a layer of chocolate frosting for an extra rich topping, which, honestly, sounds pretty decadent for these quick dessert cups!
Serving Your Spooky 3-Ingredient Halloween Dessert Cups
These dessert cups are fantastic on their own, but honestly, a little extra flair never hurt anyone! I love serving them in clear glass jars or small mason jars for that rustic, “dirt cup” look. For drinks, a simple glass of cold milk feels classic, or for something more festive, a sparkling cider with a gummy worm draped over the rim is always a hit with the kiddos. For a grown-up twist, a rich, dark coffee or even a splash of Kahlua in your coffee would be lovely alongside these. And if you’re really leaning into the Halloween theme, pair them with some mummy hot dogs or spider web pizzas for a full spooky spread. A horror movie marathon with these cups and a warm blanket? Yes please, that’s my kind of night!
The Sweet Story Behind These Easy Halloween Dessert Cups
While the concept of “dirt cups” desserts layered with crushed cookies to resemble soil has been around for a while, particularly popular at kids’ parties and potlucks across America, my personal connection to these easy Halloween treats runs a bit deeper. I first encountered a version of these at a school bake sale when I was a kid. It was simple, whimsical, and just pure fun. It wasn’t about fancy techniques or exotic ingredients, it was about creating joy with what you had. As a busy mom, rediscovering this simple, no-fuss approach to a holiday treat felt like coming full circle. It’s a reminder that sometimes the most beloved dishes are the ones that are easiest to make, allowing you to spend less time stressing in the kitchen and more time making memories, especially around holidays like Halloween. These cups embody that spirit of simple, shared happiness.
Honestly, these 3-Ingredient Halloween Dessert Cups have become a little tradition in my kitchen, a sweet, simple beacon in the midst of Halloween madness. They’re a reminder that sometimes the best things in life (and in dessert!) don’t need a million steps or a fancy ingredient list. Just a few simple components, a little love, and maybe a few “oops” moments along the way. I hope these bring as much easy joy to your home as they do to mine. Go ahead, whip some up, and tell me how your spooky creations turn out!

Frequently Asked Questions About Easy Halloween Dessert Cups
- → Can I make these 3-Ingredient Halloween Dessert Cups dairy-free?
Yes, absolutely! I’ve tried it with almond milk for the pudding and a dairy-free whipped topping. The texture is a little different, but it still tastes great! Just make sure your chocolate sandwich cookies are also dairy-free to keep it truly plant-based.
- → What if my pudding isn’t thickening up enough for these spooky treats?
Oh, I’ve been there! Usually, it means you need to whisk a bit more vigorously, or your milk wasn’t cold enough. Sometimes, though, if it’s really stubborn, pop it in the fridge for an extra 10-15 minutes. It usually sorts itself out, but a runny pudding is definitely an “oops” moment!
- → Can I use homemade whipped cream instead of frozen topping for these?
You totally can, but be warned: homemade whipped cream tends to deflate faster, especially if these cups sit for a while. If you go that route, add it right before serving, or stabilize it with a bit of powdered sugar and cornstarch. I once had a whole batch go flat, and it was a bit sad!
- → How long do these 3-Ingredient Halloween Dessert Cups last in the fridge?
Honestly, they’re best within 24 hours. After that, the cookies start to get a bit soft. I mean, they’re still edible, but they lose that lovely crunch, which is a key part of these. Keep them covered tightly to help them last a little longer, but fresh is always best!
- → Any ideas for making my Halloween dessert cups even spookier?
Definitely! I love adding gummy worms peeking out of the “dirt,” or a candy eyeball on top of the whipped cream. You could also tint the whipped topping green or orange with a tiny drop of food coloring. My kids once used candy corn to make little “graves” it was adorable chaos!

Quick 3-Ingredient Halloween Dessert Cups
- Prep Time: 15 Minutes
- Cook Time: 0 Minutes
- Total Time: 15 Minutes
- Yield: 6 Servings 1x
- Category: Desserts
Description
Whip up spooky Quick 3-Ingredient Halloween Dessert Cups! Layer chocolate pudding, crushed cookies, and whipped cream for an easy treat.
Ingredients
- Base Ingredients:
- 1 (3.9 oz) box instant chocolate pudding mix (Jell-O brand is my favorite!)
- 2 cups cold whole milk
- Crunchy Layer:
- 15–20 chocolate sandwich cookies (like Oreos), crushed
- Fluffy Topping:
- 1 (8 oz) container frozen whipped topping (like Cool Whip), thawed
- Optional Garnishes:
- Gummy worms or other Halloween candies for decoration
Instructions
- Crush Those Cookies:: Grab those chocolate sandwich cookies, about 15-20 of them, and pop them into a sturdy Ziploc bag – the freezer kind, not the flimsy sandwich ones, trust me! Now, here’s the fun part (or the stress relief, depending on your day!)—smash ’em! Use a rolling pin, the back of a spoon, or even your fist. I once got a little too enthusiastic and tore a hole in the bag, sending cookie shrapnel everywhere. Oops! Aim for fine crumbs with a few small chunks for texture. Set those aside, they’re going to be our spooky “dirt.”
- Whip Up the Pudding Magic:: In a medium bowl, combine your instant chocolate pudding mix with the cold whole milk. Get out your whisk and just go for it! Whisk vigorously for about 2 minutes. You’ll feel it start to thicken almost immediately, which honestly, always feels like kitchen magic to me. Don’t stop too soon, you want it nice and thick, not watery. This is your creamy, dreamy base for your spooky cups!
- Chill Out, Pudding:: Once your pudding is thick and luscious, cover the bowl with plastic wrap and pop it into the fridge. Let it chill for at least 5 minutes, or even longer if you’ve got the time. This little rest makes it even firmer and easier to layer. I’ve definitely been impatient and tried to layer it too soon, only for everything to sink into a chocolatey mess. Learn from my mistakes, a little chill time is your friend!
- Assemble Your Spooky Layers:: Now for the fun part: assembly! Grab your serving cups – I love clear ones so you can see all the layers. Start with a generous spoonful of your crushed cookie “dirt” at the bottom of each cup. Then, gently spoon in a layer of that rich chocolate pudding. Don’t worry if it’s not perfectly neat; a little rustic charm is part of the fun, right? I always tell myself it adds character to these easy Halloween treats!
- Layer More Dirt & Fluff:: Next, sprinkle another layer of cookie crumbs over the pudding. This is where you can get creative and decide how “dirty” you want your dessert cups to be! Then, top that with a generous dollop of your frozen whipped topping. I usually use a spoon, but if you’re feeling fancy, a piping bag with a star tip makes them look extra special. I once tried to pipe with a Ziploc bag and it burst, whipped topping everywhere! Total kitchen chaos, but still delicious.
- Garnish & Serve Your 3-Ingredient Halloween Dessert Cups:: For the final touch, sprinkle a few more cookie crumbs on top of the whipped topping. If you have any fun Halloween candies, like gummy worms peeking out or candy corn, now’s the time to add them for extra spooky flair. These are best served immediately or chilled for a bit longer. Seeing those layers come together, honestly, it always makes me smile and feel like a kitchen wizard!


