
I still remember the year my little ones decided store-bought Halloween snacks just weren’t cutting it. My kitchen, usually a calm haven, transformed into a mad scientist’s lab of cookie cutters and cheese strings. Honestly, I didn’t expect much, but those first Easy Mini Halloween Pizzas we cobbled together? Pure magic! They weren’t pretty, nope, but the giggles and cheesy smiles made them the star of our spooky night. This dish is special because it’s about shared joy, not perfection. It’s about making memories, one cheesy, slightly imperfect bite at a time.
One year, I got a little too enthusiastic with the olive “spider” toppings for our Easy Mini Halloween Pizzas. My pizzas ended up looking like they were crawling with actual arachnids, not cute ones! My youngest, bless her heart, burst into tears. Oops! We scraped off a few, added more mozzarella, and learned that sometimes, less is more when it comes to creepy-crawly pizza decor. Live and learn, right?
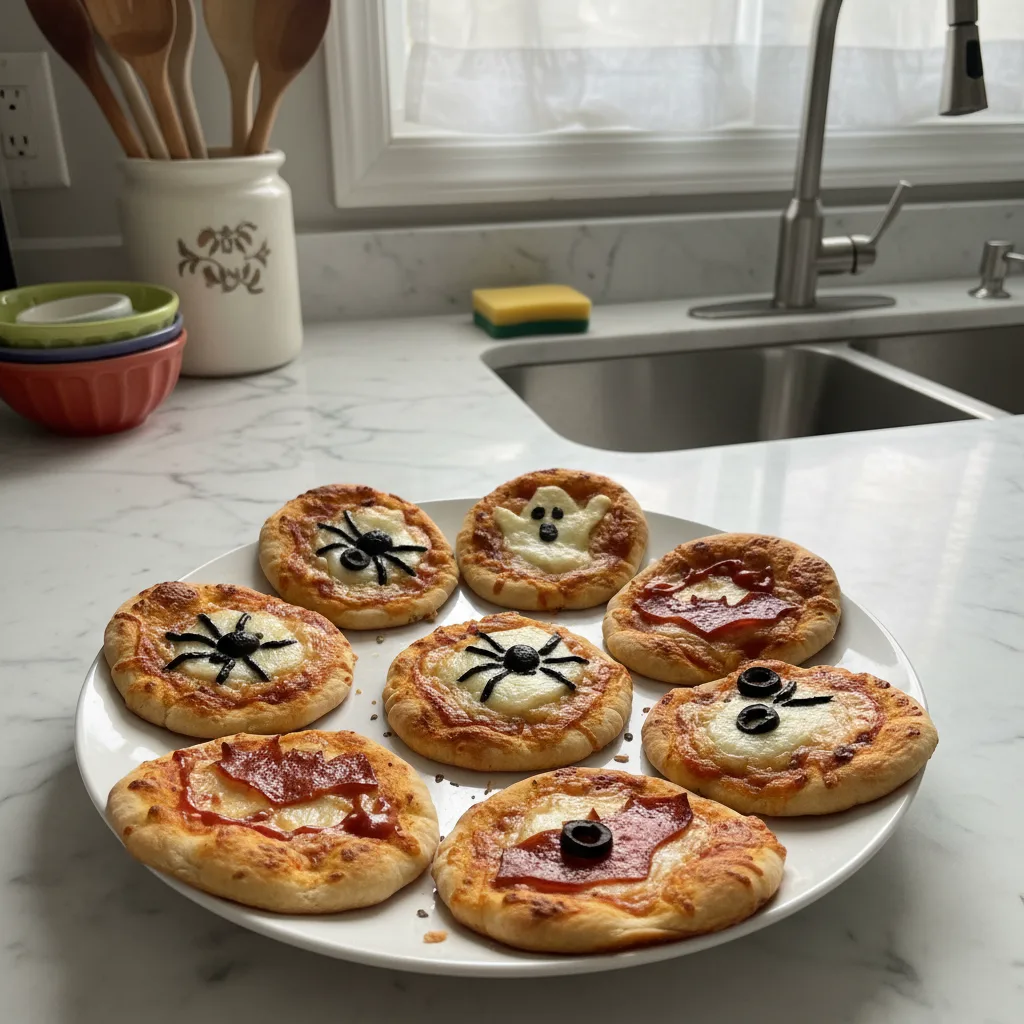
Ingredients for Easy Mini Halloween Pizzas
- Mini Pizza Crusts: Honestly, I grab the pre-made ones. Saves so much time when you’ve got little monsters (and big ones!) waiting for their Easy Mini Halloween Pizzas. I tried making my own once, and let’s just say my kitchen looked like a flour bomb went off.
- Pizza Sauce: Use a good quality jarred one! Don’t skimp here, it makes all the difference for these Easy Mini Halloween Pizzas. I once used a can of plain tomato sauce, thinking “it’s all red, right?” Nope. Big mistake. Learn from my “oops.”
- Shredded Mozzarella Cheese: The star, hon! I always buy the pre-shredded kind because, to be real, who has time to grate cheese when the spooky spirit calls? It melts beautifully and gets that perfect pull for your Easy Mini Halloween Pizzas.
- Pepperoni Slices: For those classic mini Halloween pizzas “mummy” wraps or just deliciousness. I like the smaller ones for the mini crusts, they fit perfectly without too much overlap.
- Black Olives: Essential for those creepy spider designs on your Easy Mini Halloween Pizzas. Just slice them in half for the body and thin strips for legs. I remember trying to use green olives once, and it just didn’t have the same eerie effect!
- Orange and Yellow Bell Peppers: Great for cutting into pumpkin shapes or little triangles for spooky eyes. A pop of color and a bit of crunch. I always chop extra because someone (usually me) snags a few while I’m prepping.
Instructions for Your Easy Mini Halloween Pizzas
- Gather Your Ghoulish Gear:
- First things first, preheat your oven to 400°F (200°C). While it’s warming up, get your baking sheet ready. I always line mine with parchment paper it makes cleanup so much easier, and honestly, prevents any cheesy mishaps from sticking. Trust me, I’ve had to chisel burnt cheese off a pan more times than I care to admit. This step is about setting yourself up for success, so grab all your ingredients and get them laid out like a mad scientist’s workstation!
- Sauce It Up, Spooky Style:
- Now for the fun part: grab those mini pizza crusts! Lay them out on your parchment-lined baking sheet. Spoon a thin layer of pizza sauce onto each crust, spreading it almost to the edges. Don’t go too heavy here, I once drowned a few in sauce, and they ended up a bit soggy, which was a total bummer. You want just enough to cover the base and give that lovely tomato flavor to your Easy Mini Halloween Pizzas. It should smell wonderfully savory already!
- Cheese Time, My Friend:
- Next, sprinkle a generous amount of shredded mozzarella cheese over the sauce. This is where the magic happens, right? I always go a little extra here because, well, it’s cheese! Make sure each crust is covered, ready to melt into gooey perfection. This is the foundation for your spooky designs, so make it good! I love how the white cheese looks like a blank canvas, just waiting for those creepy-crawly toppings for our Easy Mini Halloween Pizzas.
- Craft Your Creepy Toppings:
- This is where your inner artist comes out! Arrange your pepperoni slices, black olives, and bell pepper pieces. For spiders, I cut half an olive for the body and thin strips for legs so simple, so effective! Use bell pepper triangles for eyes or cut small pumpkin shapes. This is where you can get really creative with your Easy Mini Halloween Pizzas. Honestly, embrace the mess and let your imagination run wild, even an “oops” can turn into a new, fun design!
- Bake Until Bubbly & Golden:
- Pop your baking sheet of Easy Mini Halloween Pizzas into the preheated oven. Bake for about 8-12 minutes, or until the cheese is wonderfully melted and bubbly, and the crusts are golden brown around the edges. Keep an eye on them, because ovens vary, and no one wants a burnt mini pizza! The smell filling your kitchen right now should be absolutely heavenly pure pizza goodness, with a hint of Halloween excitement.
- Serve Your Spooky Slices:
- Carefully remove the Easy Mini Halloween Pizzas from the oven. Let them cool for just a minute or two seriously, don’t burn your tongue, I’ve done it too many times in my eagerness! Then, serve them up to your eager little ghouls and goblins (or yourself!). They should be warm, cheesy, and perfectly spooky. Watching everyone enjoy their creations is the best part, honestly. These are meant for sharing, laughing, and making those precious, slightly messy, Halloween memories.
There’s something so satisfying about seeing those little faces light up when these Easy Mini Halloween Pizzas come out of the oven. One year, my youngest accidentally dropped a whole sheet of olives, and we just laughed, picked up what we could, and improvised. It’s never about culinary perfection, but about the joy and the mess we make together. These are the moments I cherish most in my kitchen.
Storing Your Easy Mini Halloween Pizzas
Honestly, these Easy Mini Halloween Pizzas don’t usually last long in my house! But if you have leftovers, let them cool completely before storing. I pop them into an airtight container or a Ziploc bag. They’ll keep in the fridge for about 2-3 days. Reheating them in the microwave? I tried that once, and the crust got a bit soggy, which was a bummer. My trick is to warm them in a toaster oven or even a regular oven at 350°F (175°C) for about 5-7 minutes. That way, the crust gets nice and crispy again, and the cheese re-melts beautifully. You can even freeze them cooked, just wrap them individually in plastic wrap, then foil, and they’ll be good for a month. Thaw in the fridge and reheat as above. They make for a surprisingly good quick lunch!

Easy Mini Halloween Pizzas: Ingredient Swaps
So, you’re out of mozzarella? I’ve been there! Cheddar works, but it doesn’t get quite the same gooey pull. I once tried a blend of Monterey Jack and Colby, and honestly, it was pretty tasty, just a different vibe. For the crusts, if you can’t find mini ones, regular pita bread or even English muffins cut in half make decent Easy Mini Halloween Pizzas bases I’ve done it in a pinch, and it worked out, though the texture is definitely different. No pepperoni? Cooked crumbled sausage or even finely chopped ham works for a meaty bite. For veggie spiders, capers can give a fun, tiny look, but the flavor is quite strong, so use sparingly! You could also use sliced red onion for a more pungent spider body.
Serving Up Easy Mini Halloween Pizzas
These Easy Mini Halloween Pizzas are practically a party on their own, but I love serving them with a big, fresh green salad, maybe with a light vinaigrette, to balance out the richness. For drinks, a sparkling cider for the kids (or even us adults, let’s be real!) or a crisp, dry white wine for the grownups would be lovely. And for the ultimate spooky movie night? Pair these with a classic Halloween flick and a bowl of popcorn. Honestly, a simple veggie platter with some dip makes a great companion too. It’s all about making the meal feel special and fun for whatever spooky occasion you’re celebrating, whether it’s a big bash or a quiet family evening.
Cultural Backstory of Festive Pizzas
While mini pizzas themselves don’t have a deep, ancient history, the idea of turning food into fun, festive shapes? That’s as old as time! For me, these Easy Mini Halloween Pizzas are less about a specific cultural origin and more about creating new family traditions. It started with my grandmother, who always made “fun food” for holidays not fancy, just whimsical. She’d cut sandwiches into stars for the Fourth of July or make green pancakes for St. Patrick’s Day. This recipe is my continuation of that spirit, making ordinary food extraordinary for my own little ghouls and goblins, turning a simple dinner into a memorable, joy-filled occasion. It’s about infusing everyday moments with a little bit of magic.
Honestly, seeing these Easy Mini Halloween Pizzas come together, knowing the smiles they’ll bring, it just warms my heart. It’s more than just food, it’s about creating those little pockets of memory, those moments of shared laughter and cheesy fingers. I hope you give them a whirl and make your own spooky memories. Don’t forget to share your kitchen chaos with me!

Frequently Asked Questions About Easy Mini Halloween Pizzas
- → Can I make the Easy Mini Halloween Pizzas ahead of time?
You totally can! I often prep the bases with sauce and cheese, then cover and refrigerate. Just add the delicate toppings (like olive spiders) right before baking. It saves a ton of stress when party time hits, trust me!
- → What if I don’t have mini pizza crusts for these Easy Mini Halloween Pizzas?
No worries! English muffins sliced in half, pita bread, or even large tortillas (for a super thin crust) work wonders. I’ve used pita bread many times, and it gives a lovely, slightly chewier base. Just adjust baking time!
- → My Easy Mini Halloween Pizzas crusts always get soggy. Any tips?
Oh, I’ve been there! My biggest mistake was too much sauce. Use a thin layer of sauce and don’t overload with wet toppings. Also, a hot oven and baking on a preheated pizza stone or baking sheet helps a lot!
- → How do I store leftover Easy Mini Halloween Pizzas?
Let them cool completely, then pop them into an airtight container in the fridge for up to 3 days. Reheat in a toaster oven for crispy results, or a microwave if you don’t mind a softer crust. I always prefer the toaster oven!
- → Can I get creative with the Halloween shapes on my Easy Mini Halloween Pizzas?
Absolutely! That’s the best part! Cookie cutters are your friend for cheese or pepperoni. Think ghosts, bats, or even Frankenstein’s monster faces with bell peppers. I once made a “mummy” by crisscrossing cheese strips so fun!

Quick Easy Mini Halloween Pizzas for Spooky Fun
- Prep Time: 15 Minutes
- Cook Time: 10 Minutes
- Total Time: 25 Minutes
- Yield: 8 Servings
- Category: Dinners
Description
Whip up Easy Mini Halloween Pizzas! These spooky, cheesy treats are perfect for parties or a fun family dinner. Simple ingredients, big festive flavor.
Ingredients
- Base Ingredients:
- Mini pizza crusts (pre-made)
- Pizza sauce (jarred, good quality)
- Cheesy Goodness:
- Shredded mozzarella cheese
- Spooky Toppings:
- Pepperoni slices (small)
- Black olives
- Orange and yellow bell peppers
- Optional Flavor Boosters:
- Dried oregano or Italian seasoning
Instructions
- Gather Your Ghoulish Gear:: First things first, preheat your oven to 400°F (200°C). While it’s warming up, get your baking sheet ready. I always line mine with parchment paper – it makes cleanup so much easier, and honestly, prevents any cheesy mishaps from sticking. Trust me, I’ve had to chisel burnt cheese off a pan more times than I care to admit. This step is about setting yourself up for success, so grab all your ingredients and get them laid out like a mad scientist’s workstation!
- Sauce It Up, Spooky Style:: Now for the fun part: grab those mini pizza crusts! Lay them out on your parchment-lined baking sheet. Spoon a thin layer of pizza sauce onto each crust, spreading it almost to the edges. Don’t go too heavy here; I once drowned a few in sauce, and they ended up a bit soggy, which was a total bummer. You want just enough to cover the base and give that lovely tomato flavor to your Easy Mini Halloween Pizzas. It should smell wonderfully savory already!
- Cheese Time, My Friend:: Next, sprinkle a generous amount of shredded mozzarella cheese over the sauce. This is where the magic happens, right? I always go a little extra here because, well, it’s cheese! Make sure each crust is covered, ready to melt into gooey perfection. This is the foundation for your spooky designs, so make it good! I love how the white cheese looks like a blank canvas, just waiting for those creepy-crawly toppings for our Easy Mini Halloween Pizzas.
- Craft Your Creepy Toppings:: This is where your inner artist comes out! Arrange your pepperoni slices, black olives, and bell pepper pieces. For spiders, I cut half an olive for the body and thin strips for legs – so simple, so effective! Use bell pepper triangles for eyes or cut small pumpkin shapes. This is where you can get really creative with your Easy Mini Halloween Pizzas. Honestly, embrace the mess and let your imagination run wild; even an “oops” can turn into a new, fun design!
- Bake Until Bubbly & Golden:: Pop your baking sheet of Easy Mini Halloween Pizzas into the preheated oven. Bake for about 8-12 minutes, or until the cheese is wonderfully melted and bubbly, and the crusts are golden brown around the edges. Keep an eye on them, because ovens vary, and no one wants a burnt mini pizza! The smell filling your kitchen right now should be absolutely heavenly – pure pizza goodness, with a hint of Halloween excitement.
- Serve Your Spooky Slices:: Carefully remove the Easy Mini Halloween Pizzas from the oven. Let them cool for just a minute or two – seriously, don’t burn your tongue, I’ve done it too many times in my eagerness! Then, serve them up to your eager little ghouls and goblins (or yourself!). They should be warm, cheesy, and perfectly spooky. Watching everyone enjoy their creations is the best part, honestly. These are meant for sharing, laughing, and making those precious, slightly messy, Halloween memories.


