
Honestly, Halloween always brings me back to my first kitchen. I was maybe ten, trying to be a ‘master chef’ for our neighborhood party, and my mom, bless her heart, handed me some hot dogs and crescent dough. She said, “Let’s make some Halloween Sausage Mummy Wraps!” I remember feeling so confused, yet so excited. The kitchen turned into a flour-dusted warzone, and my first attempts looked less like mummies and more like abstract art, honestly. But the smell of baking dough and sizzling sausages? Pure magic. This dish isn’t just food, it’s a memory, a warm hug from childhood, and a reminder that even kitchen chaos can lead to something special.
I once tried to get ‘fancy’ with these Halloween Sausage Mummy Wraps, using artisanal sausages and puff pastry. Big mistake! The puff pastry puffed too much, and the sausages were too thick. My mummies looked like they’d been in a wrestling match. Honestly, sometimes the simplest ingredients are the best. It was a messy, slightly burnt, yet hilarious kitchen disaster that taught me to stick to the classics for this recipe. Keep it simple, keep it fun, and the mummies will be happy!
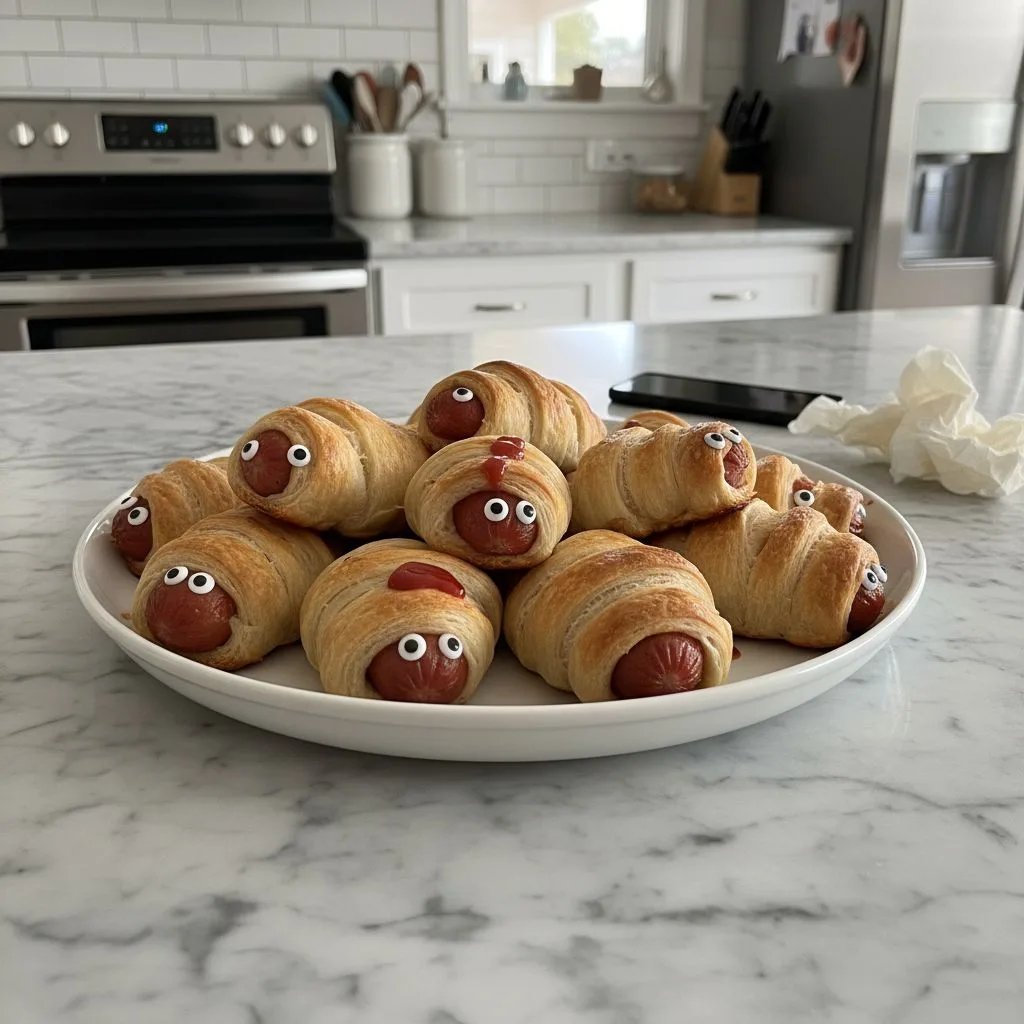
Halloween Sausage Mummy Wraps: Ingredients You’ll Need
- Hot Dogs: The absolute star of our Halloween Sausage Mummy Wraps show! I always go for a good quality, all-beef frank. Don’t use those super skinny ones, hon, they just get lost in the dough. You want a plump dog that can stand up to its mummy wrapping.
- Refrigerated Crescent Roll Dough: This is your mummy wrapping! Pillsbury is my go-to, honestly. I tried a store-brand once, and it was too sticky and tore easily. Save yourself the headache and get the good stuff. It bakes up so flaky and golden.
- Yellow Mustard: For those creepy little mummy eyes! You want that classic bright yellow for contrast. I’ve tried fancy Dijon, but it just doesn’t give the same spooky effect. Sometimes, simple is just better, you know?
- Ketchup (for serving): The perfect dipping companion, or maybe some ‘bloody’ garnish if you’re feeling extra spooky. It’s a classic for a reason, sweet and tangy, balancing the savory sausage perfectly.
- Black Sesame Seeds (optional): For an extra touch of creepy eye detail. I love how these add a bit of texture and a darker, more intense stare than just mustard alone. It’s a small detail, but it makes a big difference in the spooky factor.
- Olive Oil (for brushing): Just a tiny bit to help the crescent dough get that gorgeous golden-brown color and a lovely crispness. I sometimes forget this step, and my mummies look a little pale and sad. Don’t be like me, remember the oil!
Crafting Your Halloween Sausage Mummy Wraps
- Prep Your Hot Dogs:
- First things first, if your hot dogs are super long, slice them in half crosswise. I usually get the standard size, so I just cut them once. If you’re using cocktail sausages, no need to cut at all! Pat them dry with a paper towel, this helps the dough stick better. Honestly, I once skipped this step and the dough slipped all over the place, making for some very disheveled mummies. Don’t make my mistakes, friend.
- Unroll the Dough:
- Carefully unroll your crescent dough onto a clean surface. Don’t stretch it too much right now, we’ll get to that. You should see perforations dividing the dough into triangles. I usually separate them gently. If you tear one, honestly, don’t fret! Just pinch it back together. Kitchen mishaps happen, it’s part of the fun, right? This is where the mummy magic really begins.
- Slice the Strips:
- Using a pizza cutter or a sharp knife, cut each crescent triangle lengthwise into about 3-4 thin strips. You want them to be fairly even, but honestly, perfection isn’t the goal here. Some wonky strips just add character to your mummies! I always find this step surprisingly satisfying, seeing all those little dough ribbons ready for wrapping. It smells faintly of butter already!
- Wrap Your Mummies:
- Now for the fun part! Take one strip of dough and starting at one end of a hot dog (leaving a space for the ‘face’), begin wrapping it around the hot dog, spiraling down towards the other end. Overlap slightly, but not too much, and leave a little gap at the very bottom for the ‘feet’. Pinch the ends of the dough firmly to secure them. This is where your mummies really come to life! I always feel like a mad scientist, honestly.
- Arrange and Brush:
- Place your newly wrapped Halloween Sausage Mummy Wraps on a baking sheet lined with parchment paper. Give them a little space, they’ll puff up a bit. Once they’re all lined up, lightly brush the tops of the dough with a tiny bit of olive oil. This is my secret for that beautiful golden crust. I sometimes forget and then my mummies look a bit ghostly pale, which is fine for Halloween, but I prefer a nice tan!
- Bake to Golden Perfection:
- Pop them into your preheated oven and bake until the crescent dough is golden brown and puffy, usually about 12-15 minutes. Keep an eye on them, ovens vary! When they come out, they’ll smell amazing that warm, buttery dough and savory sausage aroma is just divine. Let them cool for a few minutes before adding the eyes. They’ll be too hot to handle otherwise, trust me!
Honestly, watching these little Halloween Sausage Mummy Wraps bake up is one of my favorite kitchen moments. The dough puffs and turns golden, and the whole house fills with this comforting aroma. I remember one year, I was so proud of my perfectly wrapped mummies, only for my little niece to declare they needed more ‘blood’ (ketchup, obviously). It’s those small, chaotic, joyful interactions that make cooking so much more than just putting food on a plate.
Storing Your Halloween Sausage Mummy Wraps Leftovers
So, you’ve got some leftover Halloween Sausage Mummy Wraps? Lucky you! They actually store pretty well, but here’s the honest truth from my kitchen: they’re best eaten fresh. The dough can get a little softer after a day or two. To store them, let them cool completely, then pop them into an airtight container. They’ll keep in the fridge for about 2-3 days. I tried microwaving them once, and the dough got a bit chewy and lost its crispness so don’t do that lol. My preferred method for reheating is in the oven or an air fryer at about 350°F (175°C) for 5-7 minutes until they’re warmed through and a bit crispy again. It brings back some of that fresh-baked magic!

Halloween Sausage Mummy Wraps: Ingredient Substitutions
Life happens, and sometimes you don’t have exactly what the recipe calls for. I get it! For the hot dogs, if you don’t have standard ones, cocktail sausages or even pre-cooked bratwurst cut into smaller pieces work great. I’ve used little smokies and they turn out adorable, mini mummies! As for the crescent dough, honestly, I haven’t found a perfect substitute that gives the same flaky texture and ease of wrapping. Puff pastry is an option, but it tends to puff up a lot more, making your mummies look a bit…fluffy. If you’re out of yellow mustard for the eyes, a tiny dot of cream cheese with a black sesame seed can work in a pinch, or just skip the eyes altogether. The fun is still there!
Halloween Sausage Mummy Wraps: Serving Ideas
These Halloween Sausage Mummy Wraps are fantastic on their own, but they really shine with a few fun dippers! Ketchup is a classic, of course, but don’t stop there. A good tangy mustard, like honey mustard or even a spicy brown mustard, is amazing. For a ‘bloody’ effect, a small bowl of marinara sauce heated up works wonders. I also love serving these with a simple green salad to balance out the richness, or maybe some spooky ‘witch’s brew’ punch. Honestly, this dish and a fun Halloween movie marathon? Yes please! They’re perfect for a casual get-together or a full-blown costume party. They disappear fast, so make extra!
The Fun Backstory of Halloween Sausage Mummy Wraps
While the exact ‘cultural backstory’ of these Halloween Sausage Mummy Wraps might just be a stroke of genius from a creative parent or a food blogger (like me!), the idea of wrapping food in dough is ancient and universal. From pigs in a blanket to klobasneks, people have been wrapping savory fillings in flaky pastry for ages. The Halloween twist, though, is pure genius! It transforms a simple appetizer into a playful, spooky treat that captures the spirit of the holiday. For me, it connects to that childhood wonder of Halloween, where everything felt a little magical and a little silly. It’s a dish that isn’t about fancy techniques, but about creating joy and a little bit of playful fright in the kitchen. It became special to me because it’s a reminder of simple, happy memories.
Honestly, making these Halloween Sausage Mummy Wraps still feels like a little bit of magic every time. They come out of the oven, golden and fragrant, and you just know they’re going to bring smiles. It’s not about culinary perfection, it’s about the joy, the memories, and sharing something fun and delicious with the people you love. I hope you and your crew have as much fun making (and eating!) these as I always do. Don’t forget to share your mummy creations with me!

Frequently Asked Questions
- → Can I make Halloween Sausage Mummy Wraps vegetarian?
Yes, you absolutely can! I’ve made them with vegetarian hot dogs before, and they work wonderfully. Just make sure your crescent dough is vegetarian-friendly, as some brands might contain animal products. The wrapping method is exactly the same, honestly!
- → What kind of crescent dough is best for these mummy wraps?
I always reach for the classic refrigerated crescent roll dough, like Pillsbury. I tried a store-brand once, and it just didn’t unroll as nicely, and the texture wasn’t quite right. It’s worth getting the good stuff for these Halloween Sausage Mummy Wraps, trust me.
- → How do I prevent my mummy wraps from unrolling during baking?
The trick is to really pinch the ends of the dough strips firmly onto the hot dog. I sometimes give them an extra little squeeze right before they go into the oven. Also, don’t stretch the dough too thin, that makes it more likely to snap. Learned that the hard way!
- → How long do Halloween Sausage Mummy Wraps last in the fridge?
They’re best eaten fresh, honestly, but you can store them in an airtight container in the fridge for about 2-3 days. They tend to soften a bit, but a quick reheat in the oven or air fryer can bring back some of that crispy goodness. I wouldn’t microwave them, though.
- → What can I serve alongside my spooky mummy wraps?
Ketchup and mustard are classic dippers! For a more ‘bloody’ effect, warm marinara sauce is fantastic. I also love serving them with a simple green salad or some baked potato wedges. A spooky punch always pairs well for a party, too!

Halloween Sausage Mummy Wraps: Easy Spooky Fun
- Prep Time: 15 Minutes
- Cook Time: 15 Minutes
- Total Time: 30 Minutes
- Yield: 8 Servings 1x
- Category: Dinners
Description
Halloween Sausage Mummy Wraps: Wrap up spooky fun! These easy hot dog mummies with crescent dough are a delicious treat for your Halloween party.
Ingredients
- Main Players:
- 1 (8-count) package hot dogs
- 1 (8-ounce) can refrigerated crescent roll dough
- Flavor Fun:
- Yellow mustard, for eyes
- Finishing Touches:
- Ketchup, for serving
- Black sesame seeds (optional, for eyes)
- 1 tablespoon olive oil, for brushing
- Optional Extras:
- A tiny sliver of cheese (cheddar or mozzarella) per hot dog
- Pinch of garlic powder or dried Italian herbs
Instructions
- Prep Your Hot Dogs:: First things first, if your hot dogs are super long, slice them in half crosswise. I usually get the standard size, so I just cut them once. If you’re using cocktail sausages, no need to cut at all! Pat them dry with a paper towel; this helps the dough stick better. Honestly, I once skipped this step and the dough slipped all over the place, making for some very disheveled mummies. Don’t make my mistakes, friend.
- Unroll the Dough:: Carefully unroll your crescent dough onto a clean surface. Don’t stretch it too much right now, we’ll get to that. You should see perforations dividing the dough into triangles. I usually separate them gently. If you tear one, honestly, don’t fret! Just pinch it back together. Kitchen mishaps happen, it’s part of the fun, right? This is where the mummy magic really begins.
- Slice the Strips:: Using a pizza cutter or a sharp knife, cut each crescent triangle lengthwise into about 3-4 thin strips. You want them to be fairly even, but honestly, perfection isn’t the goal here. Some wonky strips just add character to your mummies! I always find this step surprisingly satisfying, seeing all those little dough ribbons ready for wrapping. It smells faintly of butter already!
- Wrap Your Mummies:: Now for the fun part! Take one strip of dough and starting at one end of a hot dog (leaving a space for the ‘face’), begin wrapping it around the hot dog, spiraling down towards the other end. Overlap slightly, but not too much, and leave a little gap at the very bottom for the ‘feet’. Pinch the ends of the dough firmly to secure them. This is where your mummies really come to life! I always feel like a mad scientist, honestly.
- Arrange and Brush:: Place your newly wrapped Halloween Sausage Mummy Wraps on a baking sheet lined with parchment paper. Give them a little space, they’ll puff up a bit. Once they’re all lined up, lightly brush the tops of the dough with a tiny bit of olive oil. This is my secret for that beautiful golden crust. I sometimes forget and then my mummies look a bit ghostly pale, which is fine for Halloween, but I prefer a nice tan!
- Bake to Golden Perfection:: Pop them into your preheated oven and bake until the crescent dough is golden brown and puffy, usually about 12-15 minutes. Keep an eye on them; ovens vary! When they come out, they’ll smell amazing – that warm, buttery dough and savory sausage aroma is just divine. Let them cool for a few minutes before adding the eyes. They’ll be too hot to handle otherwise, trust me!
- Add the Eyes:: Once your mummies have cooled slightly, use a toothpick or a small dotting tool to add two small dots of yellow mustard for eyes on the ‘face’ end of each hot dog. If you’re using black sesame seeds, gently press two into the mustard dots. This is the final touch that brings your spooky Halloween Sausage Mummy Wraps to life! It’s surprisingly satisfying to see their little faces emerge.


