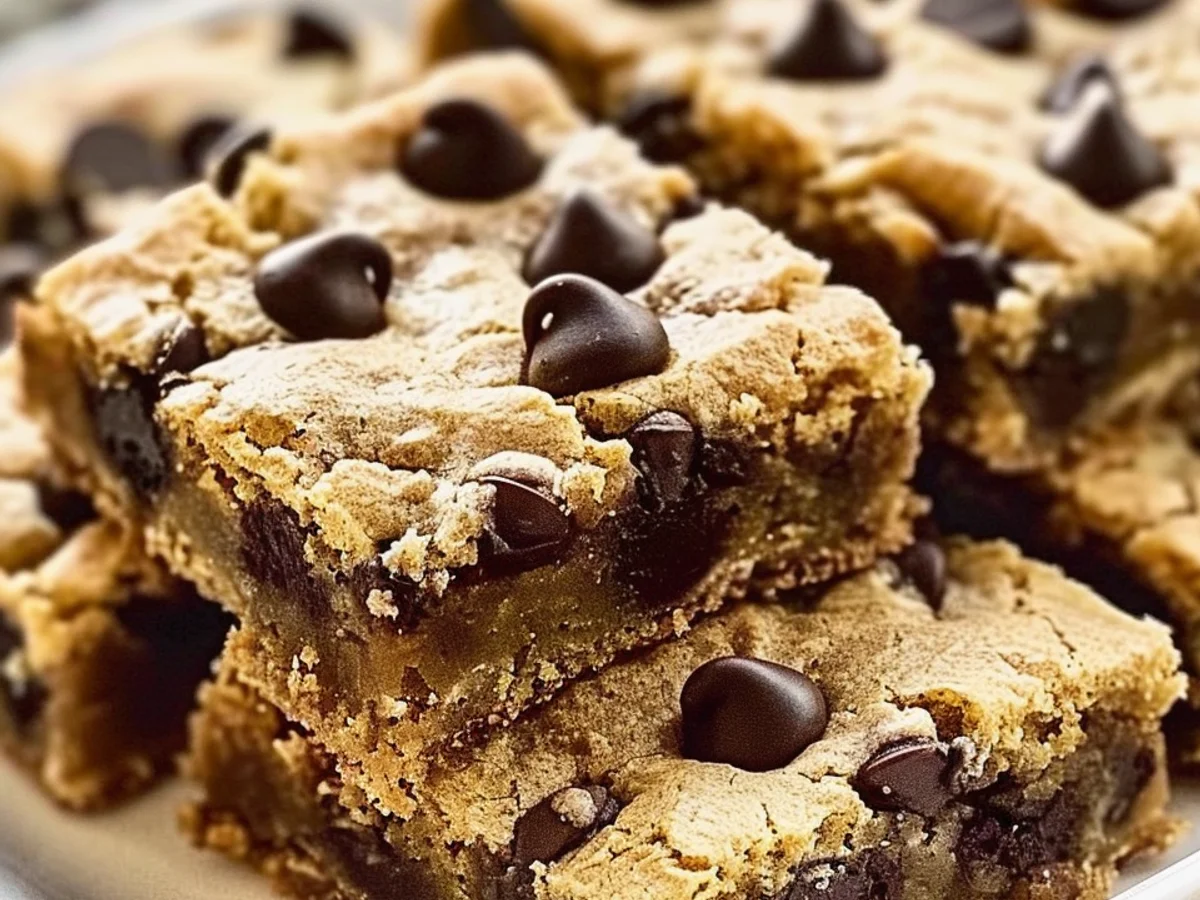
I remember the first time I attempted Chewy Chocolate Chip Cookie Bars. It was a rainy Saturday, and my little one was begging for something sweet. I’d usually just whip up regular cookies, but I was feeling adventurous, you know? The kitchen got a bit chaotic, flour everywhere, chocolate chips escaping their bowl, but the smell, oh, the smell! It filled the house with such a warm, comforting aroma. These bars became a staple, a little bit of sunshine even on the cloudiest days. They’re special because they remind me of those happy, messy baking moments.
One time, I got a little too excited with the vanilla extract and added an extra splash. Oops! The bars still turned out delicious, but with a surprisingly floral note. My husband, bless his heart, thought it was a new secret ingredient. I just smiled and nodded. It taught me that sometimes, those little kitchen mistakes can lead to unexpected, delightful twists, even with something as classic as these bars.
Ingredients for Chewy Chocolate Chip Cookie Bars
- Unsalted Butter: This is our base, giving these bars their rich, tender crumb. I always use unsalted so I can control the salt level myself. Honestly, don’t skimp here, good butter makes all the difference.
- Granulated Sugar: For that classic sweetness and a bit of crispness on the edges. I once accidentally used brown sugar here, and while it was good, it wasn’t the same texture. Stick to granulated for the right chew!
Light Brown Sugar: This is the secret to their chewiness and adds a wonderful caramel note. It also helps keep the bars moist. Fresh, soft brown sugar is key, if yours is hard, a little trick is to put it in a bag with a slice of bread overnight to soften it up.
Large Eggs: Binders! They bring everything together and contribute to that lovely texture. I’ve tried using smaller eggs, and the dough felt a bit dry, so stick to large for consistent results. Always crack them into a separate bowl first, just in case you get a shell fragment or a bad egg.
Vanilla Extract: Oh, vanilla! It deepens all the other flavors. I really prefer pure vanilla extract, the imitation stuff just doesn’t give you that warm, comforting aroma. I once ran out and used almond extract it was an interesting twist, but not what I wanted for this classic recipe.
- All-Purpose Flour: The structure! Don’t overmix it, or your bars will be tough, not chewy. I usually just spoon and level it into my measuring cup, scooping directly from the bag can pack too much in.
- Baking Soda: Our leavening agent, giving a slight lift and helping with that soft texture. Make sure yours isn’t expired, or your bars might end up a bit dense. I always keep a fresh box on hand.
- Salt: Essential for balancing the sweetness and bringing out the chocolate flavor. A pinch really makes a difference. I’ve forgotten it once, and the bars tasted a bit flat. Never again!
- Semi-Sweet Chocolate Chips: The star, honestly. I love semi-sweet because it’s not too bitter, not too sweet. I’ve tried milk chocolate, but it can be a bit overwhelmingly sweet for me. You can use a mix of chips too, like some dark and some milk, for a more complex chocolatey experience.
- Flaky Sea Salt (for sprinkling): This is an optional but seriously recommended finishing touch. It adds a lovely contrast and a little sparkle. I always keep a small jar of good quality flaky sea salt just for baking.
How to Make Chewy Chocolate Chip Cookie Bars
- Prep & Melt:
- First things first, preheat your oven to 350°F (175°C). Then, grab a 9×13 inch baking pan and line it with parchment paper, leaving a slight overhang on the sides. This makes lifting out the bars so much easier later, believe me. Next, melt your unsalted butter. You can do this gently on the stovetop or in the microwave. Just make sure it’s fully melted but not boiling. I always get a little excited and sometimes let it get too hot, then have to wait for it to cool down a bit. Patience, Mama Tessa!
- Whisk the Sugars:
- In a large mixing bowl, combine the melted butter with both the granulated sugar and the light brown sugar. Whisk them together really well until the mixture is smooth and glossy. You want to see those sugars dissolving a bit. This step is crucial for that signature chewy texture in this recipe. I usually whisk for a good minute or two, letting my arm get a little workout. It should look like a rich, golden syrup.
- Add Eggs & Vanilla:
- Now, crack in your large eggs, one at a time, whisking vigorously after each addition. Then, pour in that glorious vanilla extract. Whisk for another minute or so until the mixture is lightened in color and looks thick and creamy. It should be almost fluffy. This is where the magic starts to happen, creating a beautiful emulsion that will make your bars so tender. Don’t rush this part, it’s worth the extra effort!
- Combine Dry Ingredients:
- In a separate medium bowl, whisk together your all-purpose flour, baking soda, and salt. Make sure there are no lumps, we want everything evenly distributed. This ensures a consistent rise and flavor throughout the bars. I sometimes use a sifter here, especially if my flour has been sitting for a while, just to be sure. It smells faintly of warm wheat, a comforting scent.
- Mix Wet & Dry:
- Gently add the dry ingredient mixture to the wet ingredients. Mix with a spatula or a wooden spoon until just combined. Seriously, stop mixing as soon as you see no more streaks of flour. Overmixing develops the gluten too much, and we’ll end up with tough bars instead of wonderfully chewy ones. This is where I always have to resist the urge to keep stirring!
- Fold in Chocolate Chips & Bake:
- Finally, fold in your semi-sweet chocolate chips. Don’t be shy, load ’em up! Pour the dough into your prepared baking pan and spread it evenly. Sprinkle with a little flaky sea salt if you’re feeling fancy (and you should!). Pop it into the preheated oven and bake for 25-30 minutes, or until the edges are golden brown and the center is set but still looks a little soft. A toothpick inserted into the center should come out with moist crumbs, not wet batter. The kitchen will smell absolutely divine that’s how you know your Chewy Chocolate Chip Cookie Bars are almost ready!
There was this one time I was making a batch of bars for a potluck, and I completely forgot to add the baking soda. I realized it halfway through baking when they weren’t rising at all! I just laughed, pulled them out, and called them “chocolate chip fudgy bricks.” Everyone still loved them, but it taught me to double-check my leavening agents. Kitchen chaos is just part of the baking adventure, right?
Storage Tips for Chewy Chocolate Chip Cookie Bars
These bars store surprisingly well, which is great because sometimes you just want to nibble on a sweet treat for a few days. Once they’re completely cooled (and this is important, otherwise you’ll get condensation), cut them into squares. I find storing them in an airtight container at room temperature is best, they’ll stay deliciously chewy for up to 3-4 days. I’ve tried refrigerating them, and honestly, they get a bit firm, losing some of that lovely softness. If you do chill them, let them come back to room temperature or give them a quick 10-second zap in the microwave to bring back that gooey center. For longer storage, you can freeze them for up to 2-3 months. Just wrap individual bars tightly in plastic wrap before placing them in a freezer-safe bag or container. Thaw them at room temperature when a craving strikes!
[img_to_be_inserted]https://www.baketrove.com/wp-content/uploads/2025/09/chewy-chocolate-chip-cookie-bars-blog-image-1-1.webp[img_to_be_inserted]
Chewy Chocolate Chip Cookie Bars: Ingredient Substitutions
Life happens, and sometimes you don’t have exactly what the recipe calls for. I get it! For the chocolate chips, I’ve swapped in milk chocolate chips when that’s all I had, and while sweeter, they still made for tasty treats. Dark chocolate chips are also a fantastic option if you prefer less sweetness. I even tried a mix of chocolate chunks and chips once, which added a nice textural variety. If you’re out of light brown sugar, you can actually make your own by mixing a tablespoon of molasses into a cup of granulated sugar I tried it once in a pinch, and it worked surprisingly well for maintaining that chewiness. For the butter, I wouldn’t recommend margarine, but a good quality plant-based butter might work if you’re dairy-free, though I haven’t personally perfected that swap for these bars yet. Experimenting is part of the fun!
Serving Chewy Chocolate Chip Cookie Bars
These bars are fantastic on their own, warm from the oven, with that melted chocolate just begging to be devoured. But oh, the possibilities! My absolute favorite way to serve them is slightly warm with a scoop of vanilla bean ice cream melting on top the contrast of warm and cold is just heavenly. A drizzle of caramel sauce or a sprinkle of toasted pecans also takes them to another level. They’re also perfect with a tall glass of cold milk, or for the adults, a strong cup of coffee or even a little espresso. Honestly, these bars are the kind of treat that makes a simple movie night feel like a special occasion. They’re great for school lunchboxes, bake sales, or just a little pick-me-up any time of day. So versatile!
The Sweet Backstory of Chewy Chocolate Chip Cookie Bars
Chocolate chip cookies have such a rich American history, invented by Ruth Graves Wakefield at the Toll House Inn in the 1930s. This recipe is a natural evolution, taking that beloved cookie dough and baking it in a pan for easy slicing and sharing. For me, they connect back to my grandma’s kitchen. She wasn’t one for fussy desserts, but she always had a tray of something simple and comforting, usually a cookie bar of some kind. This particular recipe reminds me of her practical love a delicious treat, easy to make, and perfect for sharing with everyone who walked through her door. It’s a little piece of that old-fashioned hospitality, baked right into every square.
Honestly, every time I pull a pan of these bars from the oven, that warm, buttery chocolate smell just fills my heart. It brings a little bit of joy into the house, no matter what kind of day it’s been. They’re more than just a dessert, they’re a little piece of comfort, a sweet reminder of home. I hope you love them as much as my family and I do. Don’t forget to share your own kitchen adventures with these!
[img_to_be_inserted]https://www.baketrove.com/wp-content/uploads/2025/09/chewy-chocolate-chip-cookie-bars-blog-image-2-1.webp[img_to_be_inserted]
Frequently Asked Questions about Chewy Chocolate Chip Cookie Bars
- → How do I get my bars extra chewy?
The secret is using a good mix of granulated and brown sugar, and most importantly, not overbaking them! Pull them from the oven when the edges are golden but the center still looks a bit soft. They’ll continue to set as they cool.
- → Can I use different kinds of chocolate chips?
Absolutely! I’ve tried dark chocolate, milk chocolate, and even white chocolate chips in these. A mix is also really fun. Just use what you love or what you have on hand, they’ll still be delicious!
- → Why did my bars turn out dry?
Usually, dry bars mean they were overbaked. Next time, try reducing the baking time by a couple of minutes. Also, make sure you’re not overmixing the flour, that can lead to a tougher, drier texture.
- → How long do these bars last?
Stored in an airtight container at room temperature, they’re fantastic for 3-4 days. I wouldn’t recommend refrigerating them unless you plan to warm them up a bit, as they can get a little hard. Freezing works great for longer!
- → Can I add nuts to my bars?
Oh, yes! Chopped walnuts or pecans would be a lovely addition. I’d recommend toasting them lightly first to bring out their flavor. Fold them in with the chocolate chips for an extra layer of texture and taste.

