Description
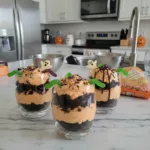
Whip up spooky Quick 3-Ingredient Halloween Dessert Cups! Layer chocolate pudding, crushed cookies, and whipped cream for an easy treat.
Ingredients
Scale
- Base Ingredients:
- 1 (3.9 oz) box instant chocolate pudding mix (Jell-O brand is my favorite!)
- 2 cups cold whole milk
- Crunchy Layer:
- 15–20 chocolate sandwich cookies (like Oreos), crushed
- Fluffy Topping:
- 1 (8 oz) container frozen whipped topping (like Cool Whip), thawed
- Optional Garnishes:
- Gummy worms or other Halloween candies for decoration
Instructions
- Crush Those Cookies:: Grab those chocolate sandwich cookies, about 15-20 of them, and pop them into a sturdy Ziploc bag – the freezer kind, not the flimsy sandwich ones, trust me! Now, here’s the fun part (or the stress relief, depending on your day!)—smash ’em! Use a rolling pin, the back of a spoon, or even your fist. I once got a little too enthusiastic and tore a hole in the bag, sending cookie shrapnel everywhere. Oops! Aim for fine crumbs with a few small chunks for texture. Set those aside, they’re going to be our spooky “dirt.”
- Whip Up the Pudding Magic:: In a medium bowl, combine your instant chocolate pudding mix with the cold whole milk. Get out your whisk and just go for it! Whisk vigorously for about 2 minutes. You’ll feel it start to thicken almost immediately, which honestly, always feels like kitchen magic to me. Don’t stop too soon, you want it nice and thick, not watery. This is your creamy, dreamy base for your spooky cups!
- Chill Out, Pudding:: Once your pudding is thick and luscious, cover the bowl with plastic wrap and pop it into the fridge. Let it chill for at least 5 minutes, or even longer if you’ve got the time. This little rest makes it even firmer and easier to layer. I’ve definitely been impatient and tried to layer it too soon, only for everything to sink into a chocolatey mess. Learn from my mistakes, a little chill time is your friend!
- Assemble Your Spooky Layers:: Now for the fun part: assembly! Grab your serving cups – I love clear ones so you can see all the layers. Start with a generous spoonful of your crushed cookie “dirt” at the bottom of each cup. Then, gently spoon in a layer of that rich chocolate pudding. Don’t worry if it’s not perfectly neat; a little rustic charm is part of the fun, right? I always tell myself it adds character to these easy Halloween treats!
- Layer More Dirt & Fluff:: Next, sprinkle another layer of cookie crumbs over the pudding. This is where you can get creative and decide how “dirty” you want your dessert cups to be! Then, top that with a generous dollop of your frozen whipped topping. I usually use a spoon, but if you’re feeling fancy, a piping bag with a star tip makes them look extra special. I once tried to pipe with a Ziploc bag and it burst, whipped topping everywhere! Total kitchen chaos, but still delicious.
- Garnish & Serve Your 3-Ingredient Halloween Dessert Cups:: For the final touch, sprinkle a few more cookie crumbs on top of the whipped topping. If you have any fun Halloween candies, like gummy worms peeking out or candy corn, now’s the time to add them for extra spooky flair. These are best served immediately or chilled for a bit longer. Seeing those layers come together, honestly, it always makes me smile and feel like a kitchen wizard!